Account Admins can add team members and assign roles to grant the right level of access. If you're on a Premium or Enterprise plan, you can create custom roles to grant specific permissions to team members to meet your business' needs.
Overview
In Account Settings > Team Members, you can add team members to collaborate on automations, help with integrations, and more across your workspaces. Customer.io does not charge for team members, so feel free to grant access to anyone that you need! Only Account Admins can add team members. And each account can have up to 300 team members across all workspaces.
For each team member, you’ll need to decide the level of access they should have to your account and to each of your workspaces.
Account-level permissions are defined in Account Admin and Member roles.
Workspace-level permissions are defined by standard or custom roles.
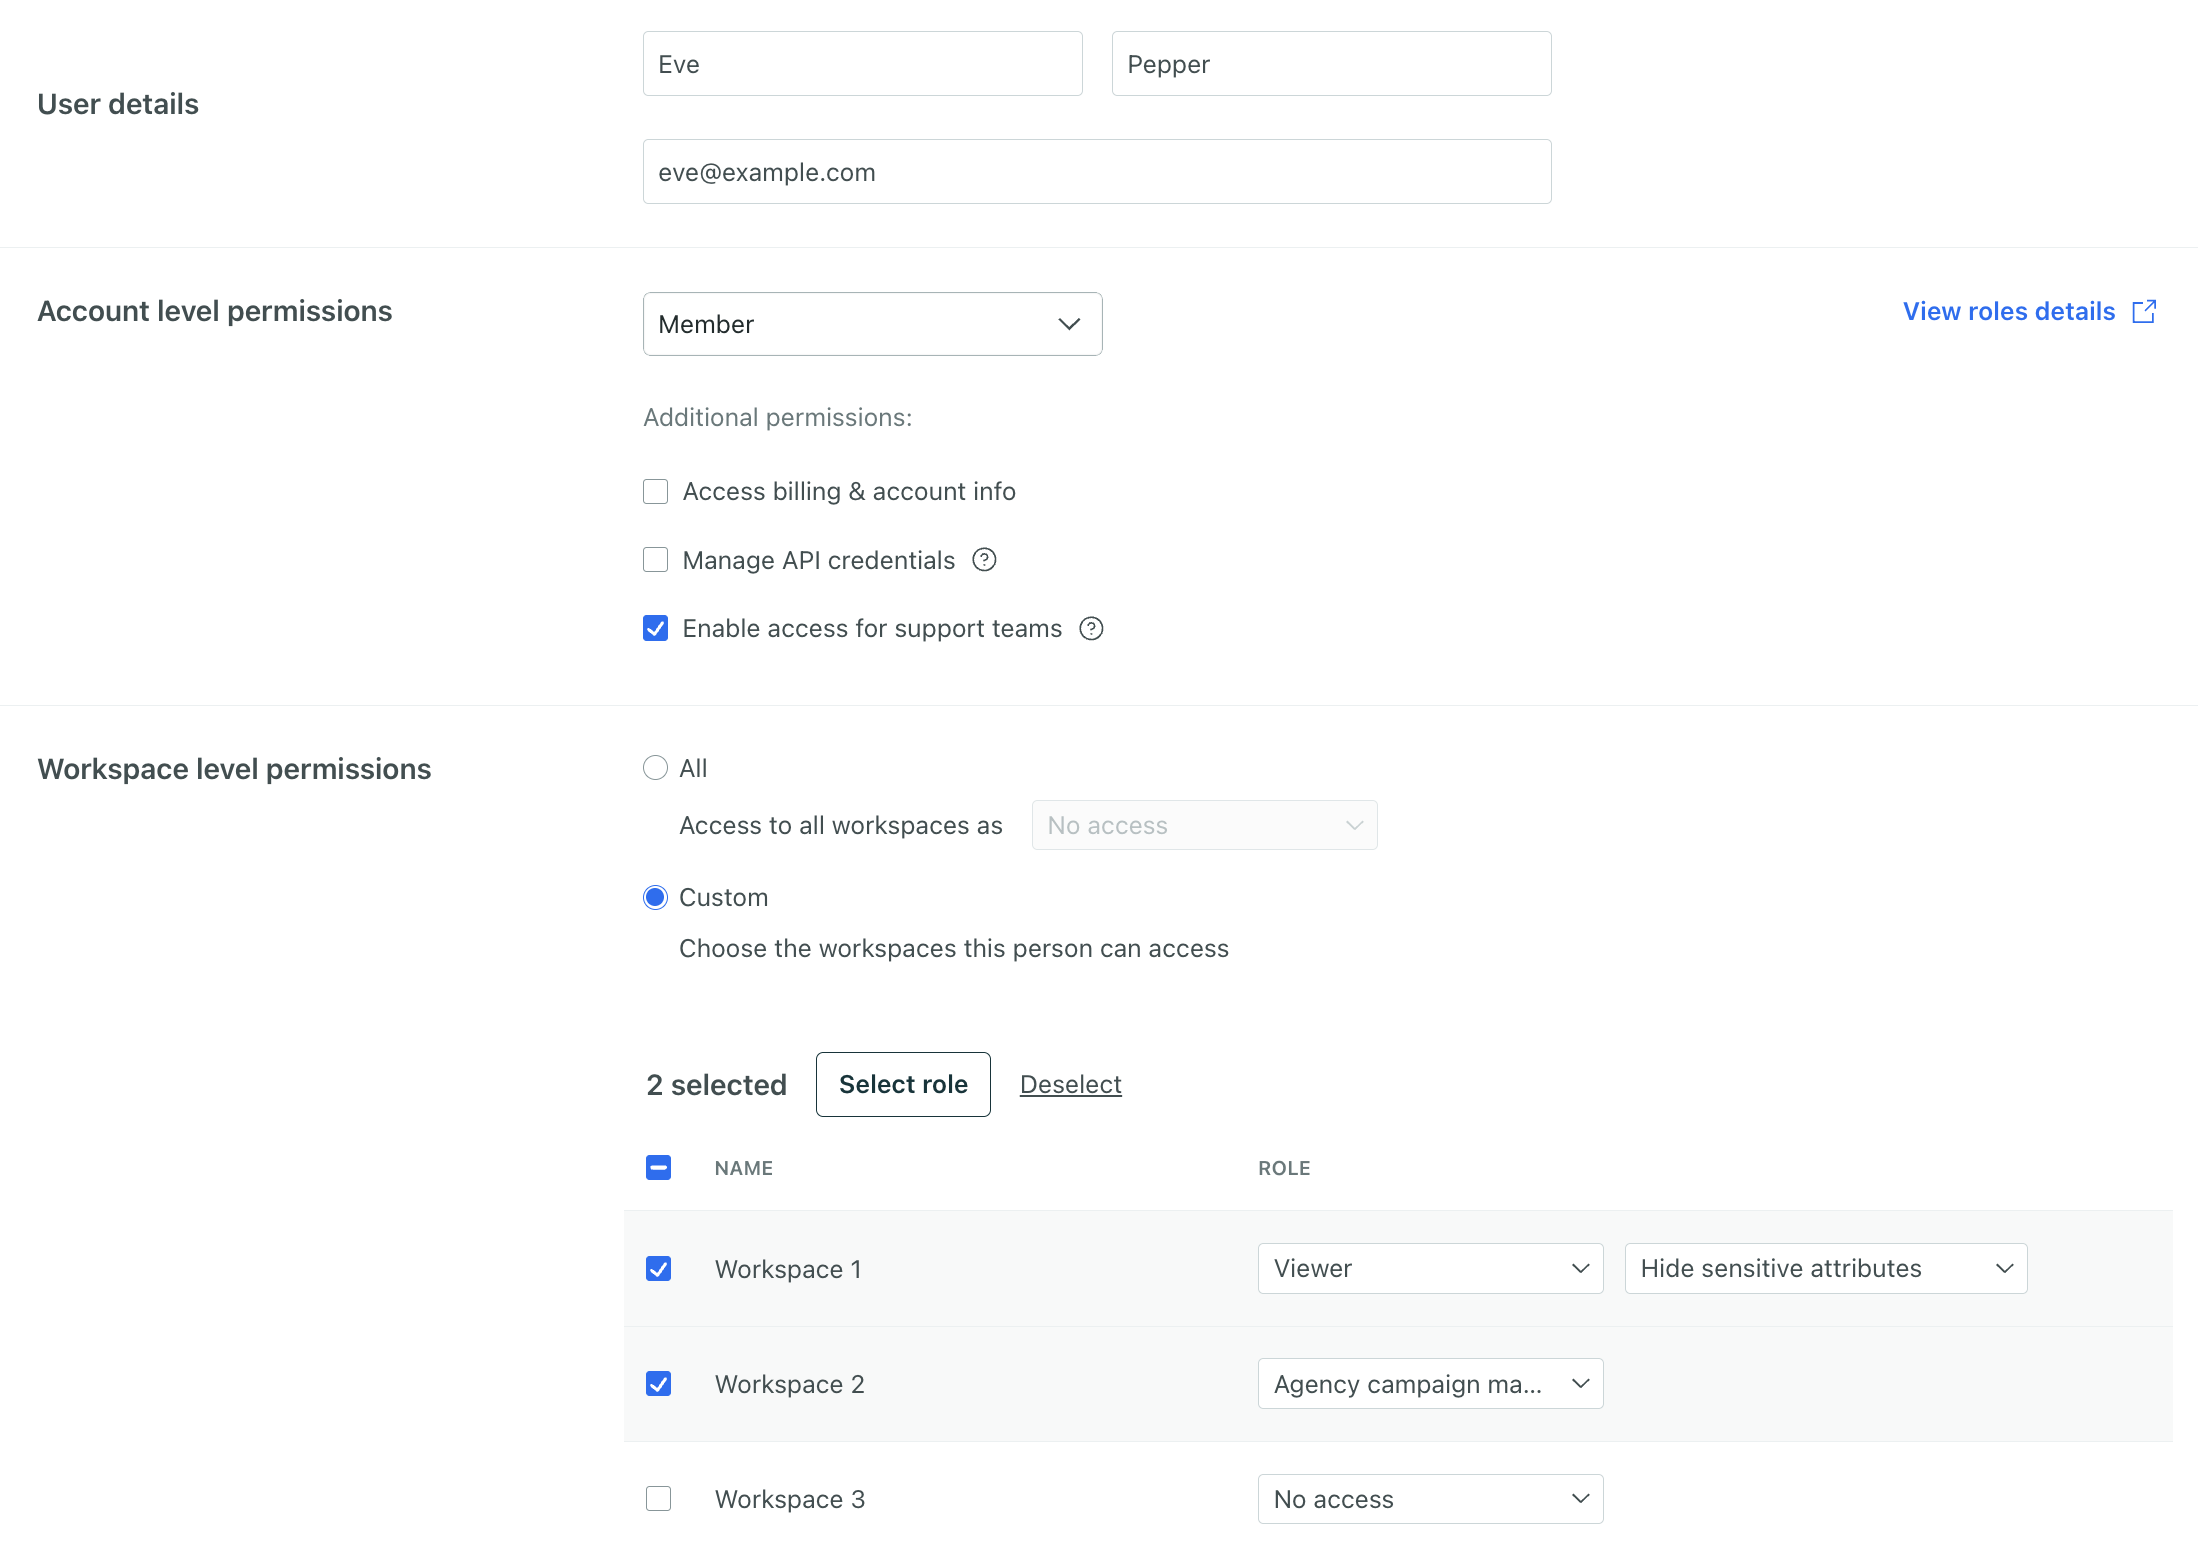
In this example, Eve will be invited as a Member with the ability to grant Customer.io access to the account to help troubleshoot. She’ll be a Viewer with limited access to data for Workspace 1, have a custom role for Workspace 2, and have no access to Workspace 3.
Account-level roles
Every team member has an account-level role—Account Admin or Member.
Account Admins have all permissions available across your account and every workspace. Think of them as account owners—they can manage billing, team members, API credentials, integrations, workspace data, create automations, and more. Account admins are always Workspace Admins; they have full permissions to the account and all workspaces.
Members have partial access to your account. They can view but not manage team members or cookie settings. You can optionally give them the power to access billing and account info, manage API credentials, and enable access for support teams at Customer.io. To give them access to a workspace, you must assign a workspace-level role.
Workspace-level roles
After you decide the account-level permissions for your team member, you can assign them access to one or more workspaces.
Choose from a list of standard roles to grant them predefined sets of permissions:
Workspace Admin
Author
Viewer
If you’re on a Premium or Enterprise plan, you can also create and assign your own custom roles with specific sets of permissions.
Each team member can have access to one or more workspaces, but can only have one role per workspace. For instance, you can assign them as a Workspace Admin for your demo workspace but a Viewer of your production workspace.
Hide sensitive data
Account Admins and Workspace Admins can mark data as sensitive in the Data Index then choose which team members to hide this info from. This helps secure your data and comply with privacy regulations.
How you hide sensitive data depends on the type of workspace-level role a team member has.
For standard roles, admins choose “Hide sensitive attributes” when assigning the role.
For custom roles (only available on Premium or Enterprise plans), admins choose “Hide sensitive attributes” when creating the role.
This means everyone with the same custom role has the same visibility into data, whereas everyone with the same standard role could have different visibilities into workspace data. If that’s an issue, consider creating the standard roles as custom roles.
Compare Account Admin to Member permissions
Permission
Account Admin
Member
Company Details
View
optional, must grant permission “Access billing & account info”
Update
optional, must grant permission “Access billing & account info”
Workspaces
View
Create
Update
Delete
Two-factor Authentication
View
Update
SSO
View
Update
API Credentials
Create
optional, must grant permission “Manage API credentials”
View
optional, must grant permission “Manage API credentials”
Delete
optional, must grant permission “Manage API credentials”
Team Members
View
Create
Update
Delete
Plan Details
View
optional, must grant permission “Access billing & account info”
Update
optional, must grant permission “Access billing & account info”
Cancel
optional, must grant permission “Access billing & account info”
Billing History
View
optional, must grant permission “Access billing & account info”
Export
optional, must grant permission “Access billing & account info”
Cookie Settings
View
Update
Support Team Access
View
Update
optional, must grant permission “Enable access for support teams”
Experimental Features
View
Update
Privacy & Data settings
View
Update
View team members
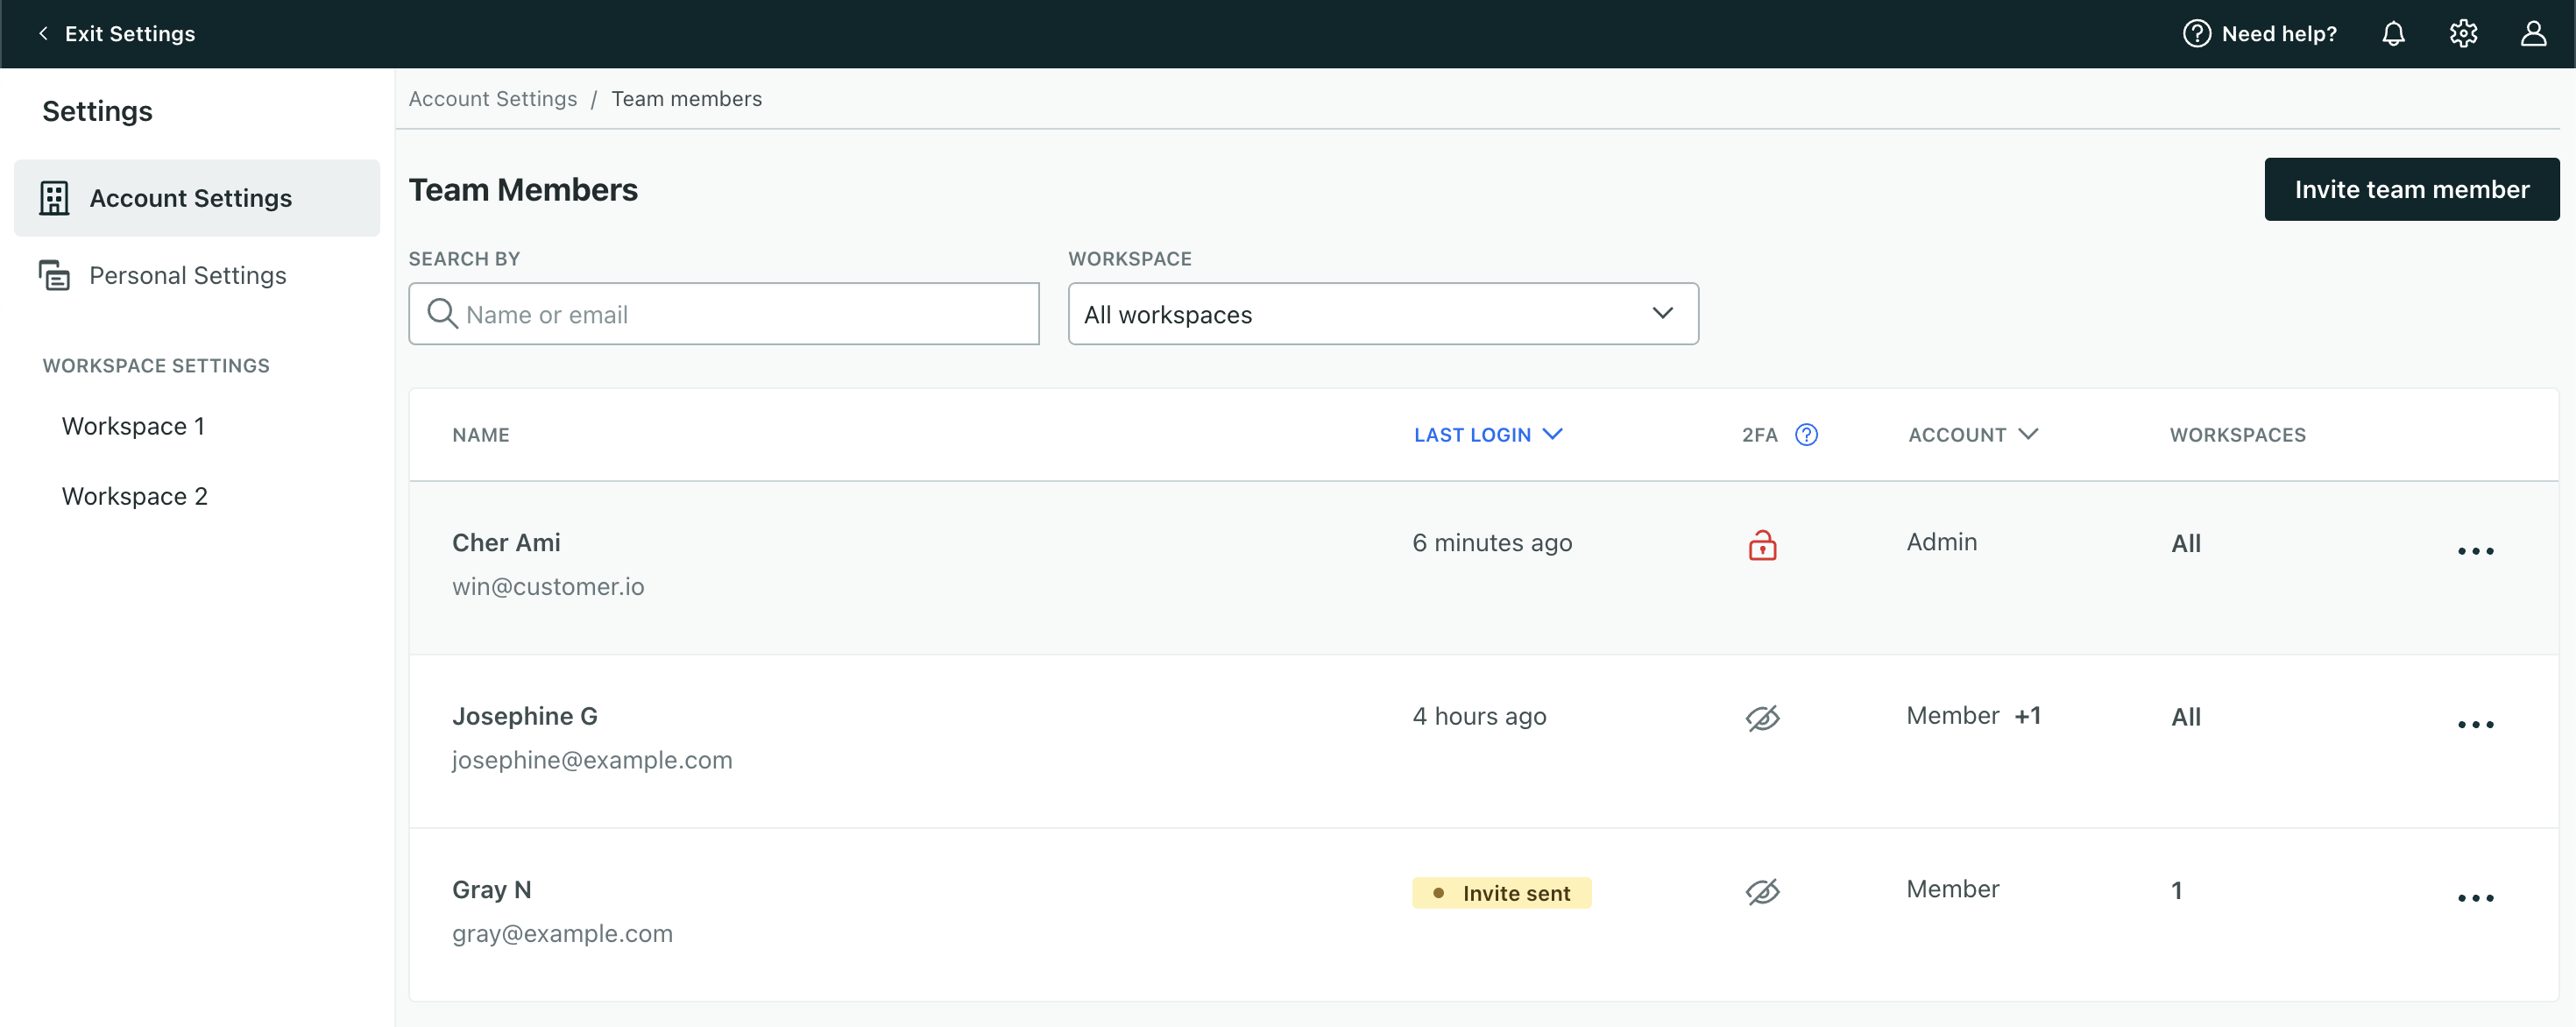
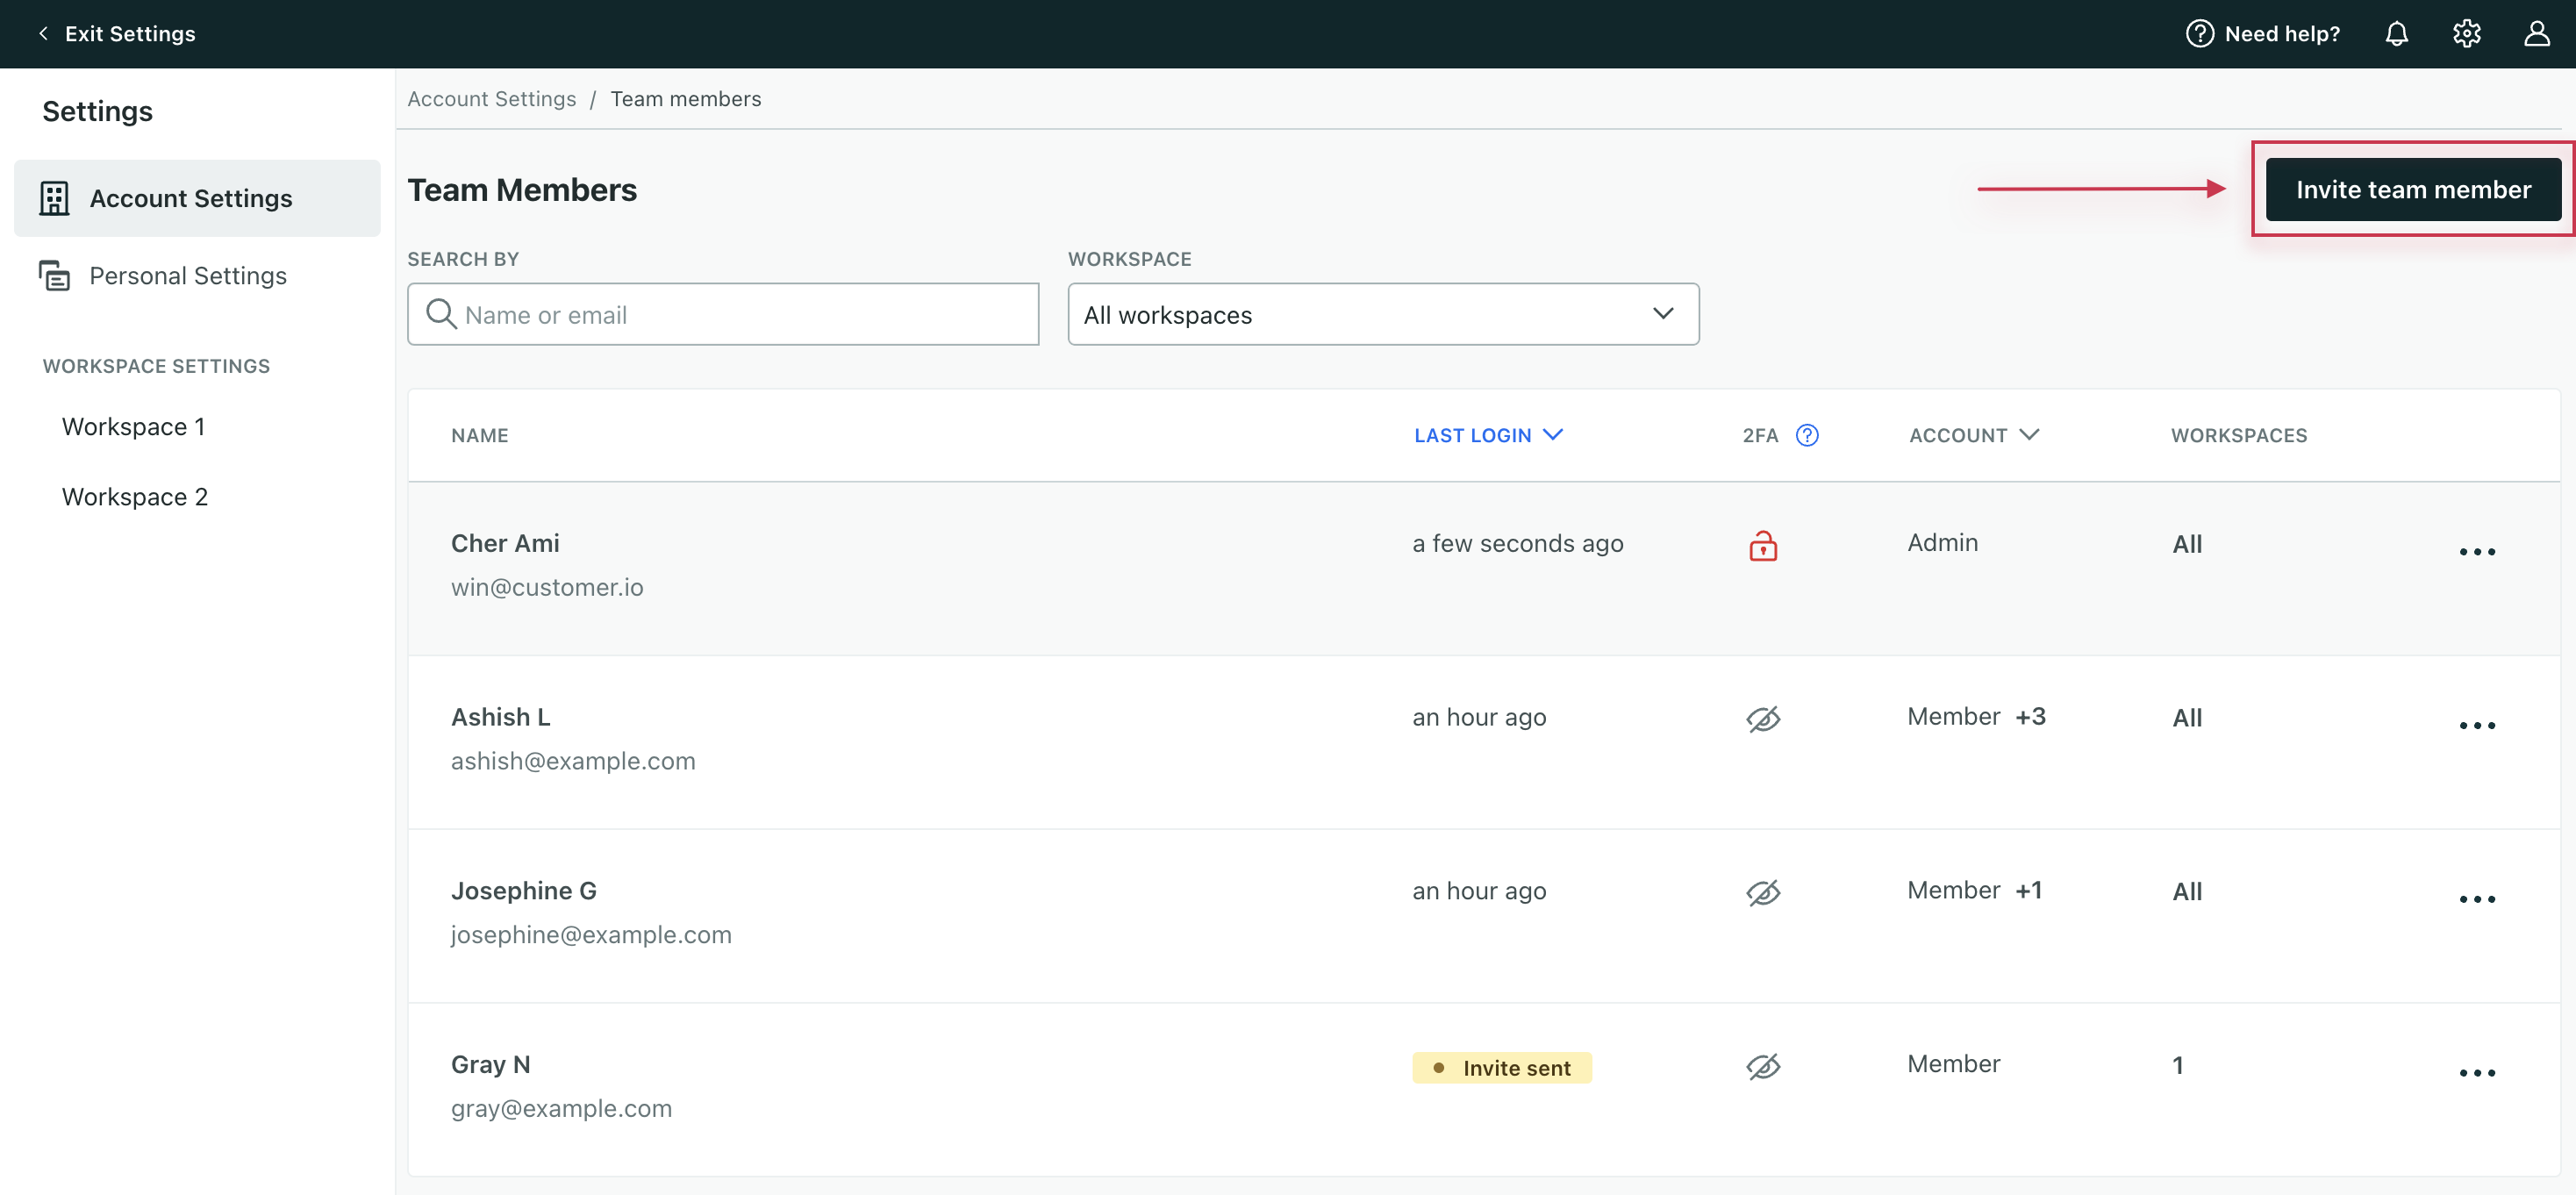
In Account Settings, the Team Members table shows you:
Who has access to your account
When they last logged in
Whether two-factor authentication (2FA) is enabled
Their account-level roles
Which workspaces they have access to
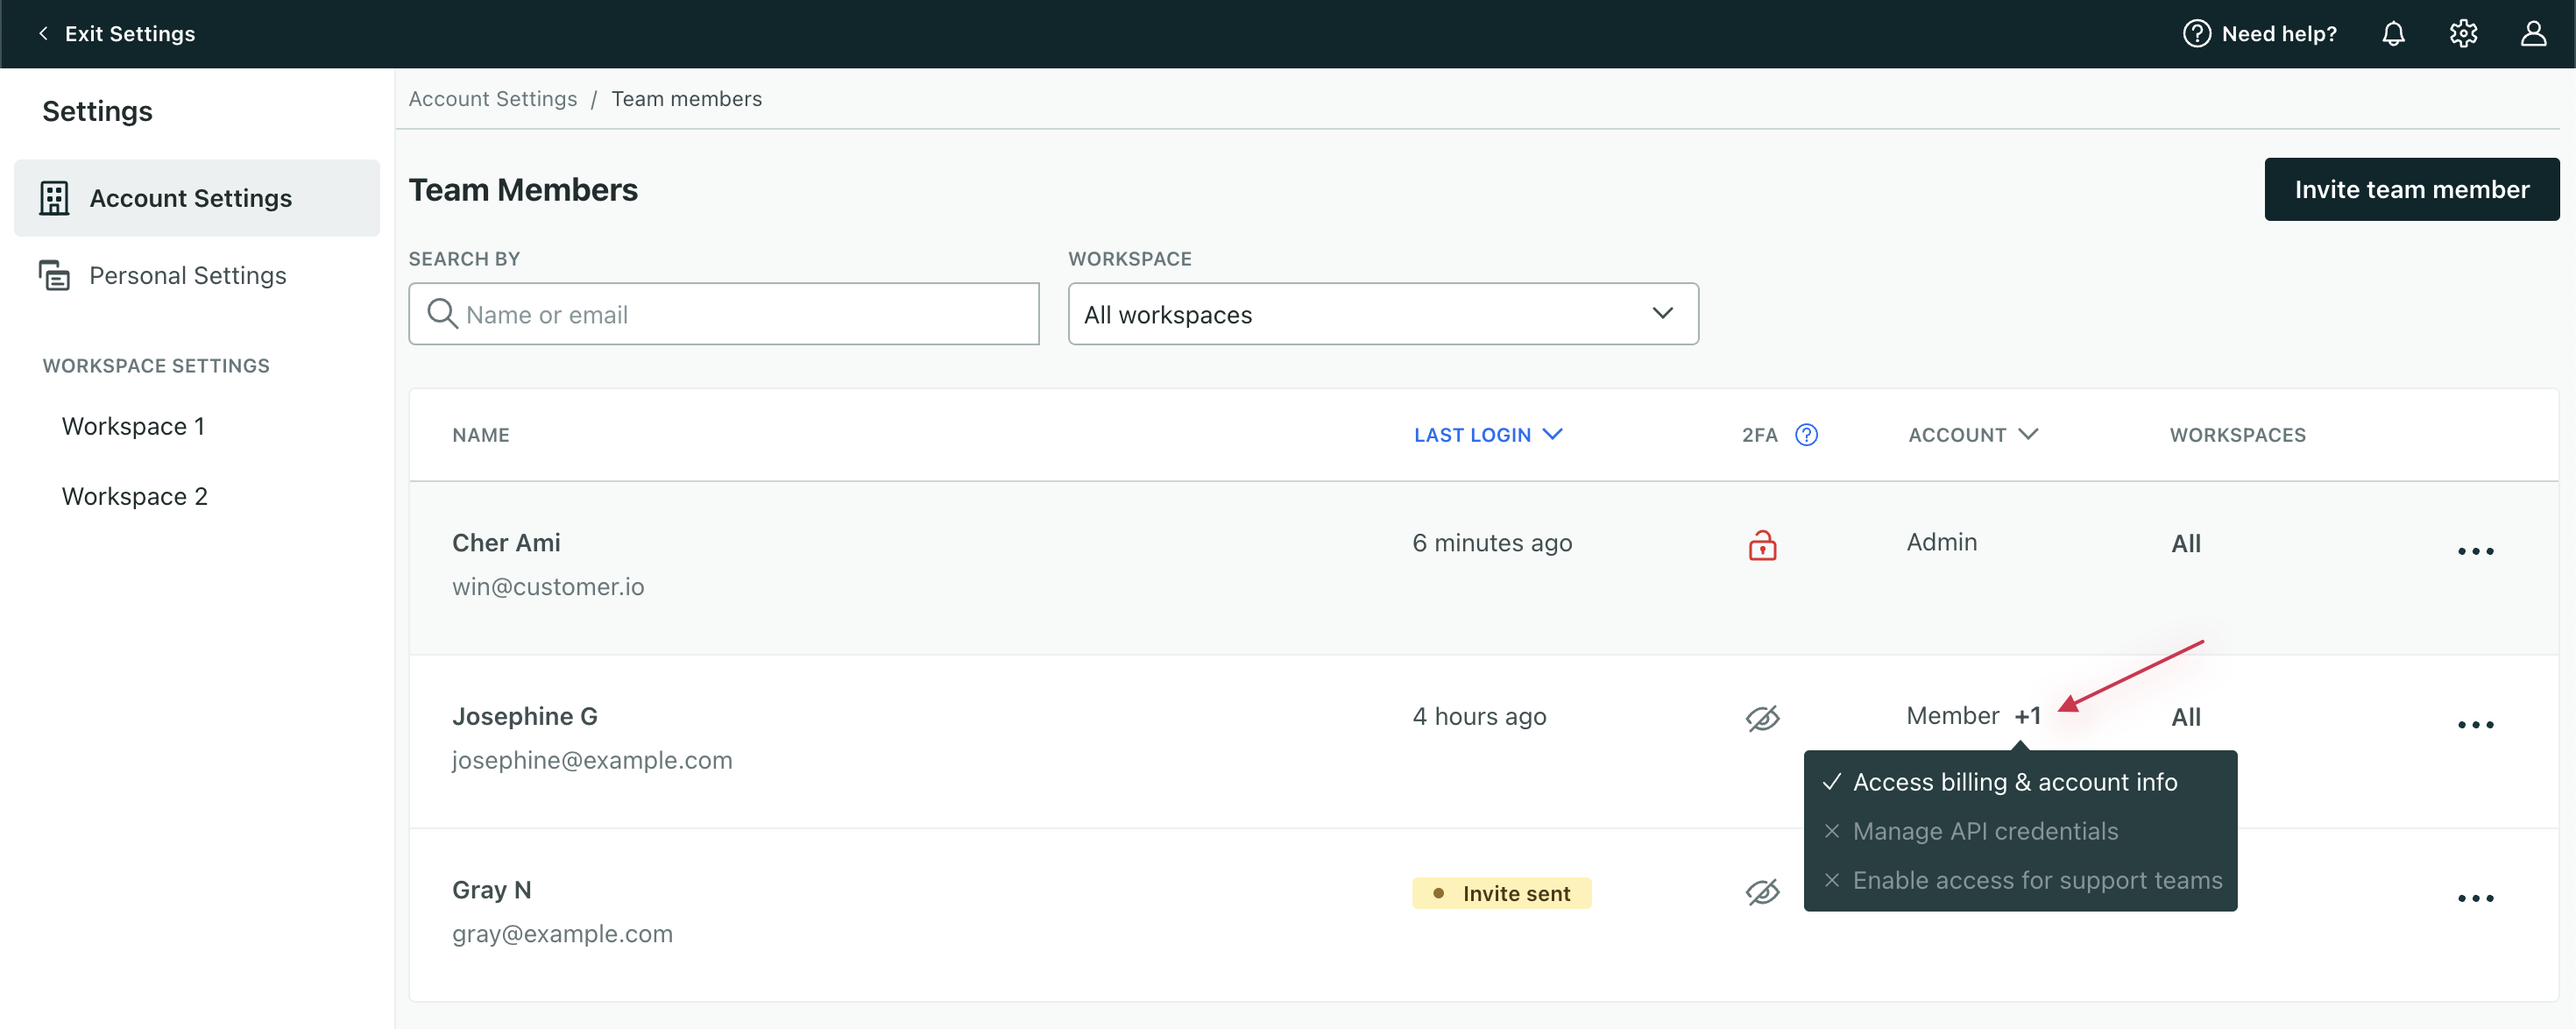
Under Account, hover over to see additional account-level permissions each Member has.
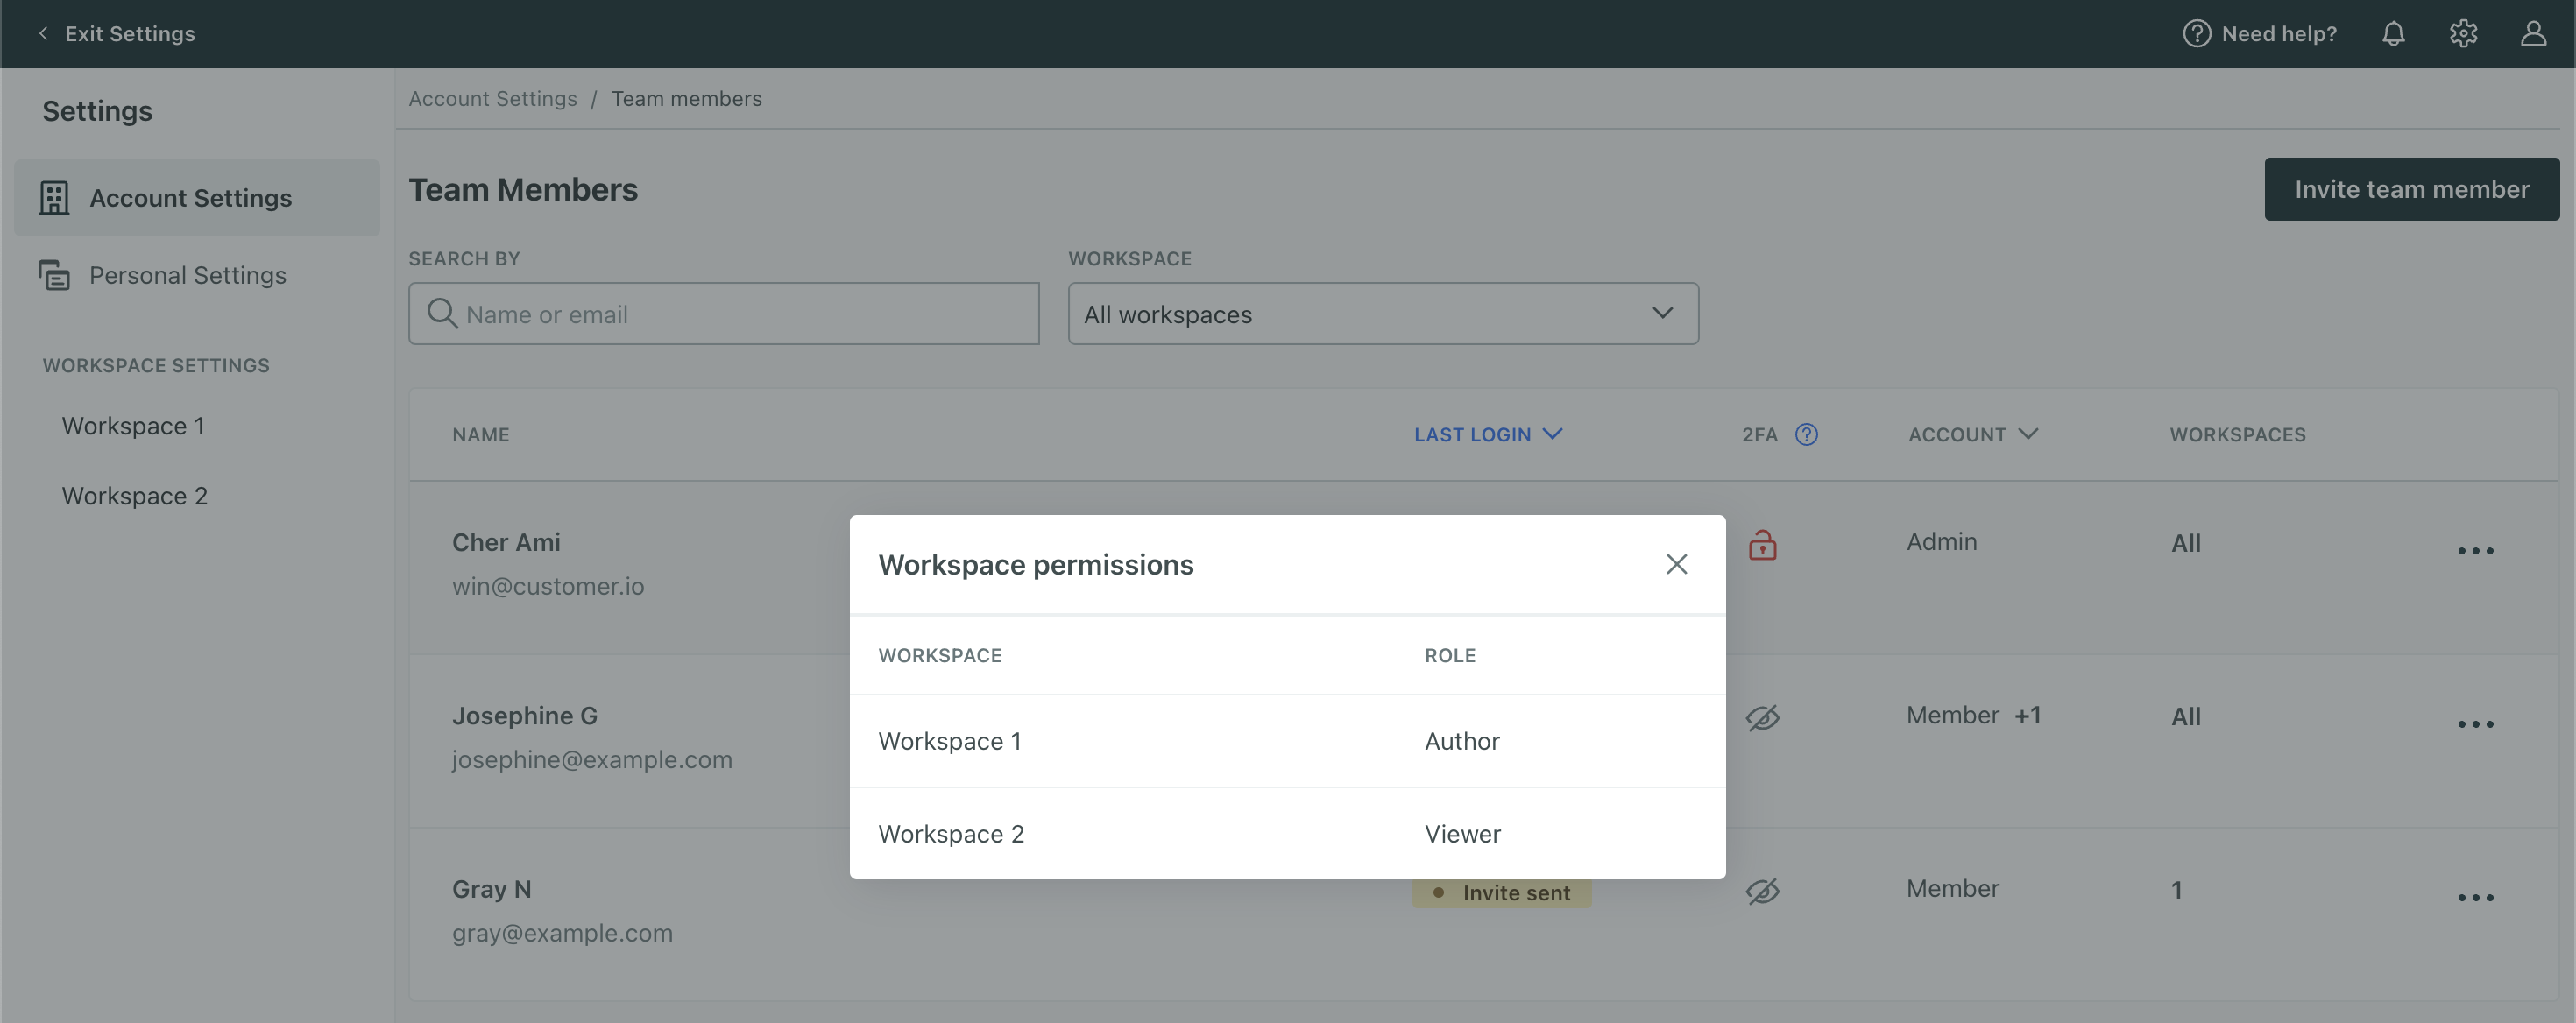
Under Workspaces, click the value to see a list of each role a team member has for each workspace.
Add team members
To add or remove team members, you must be an Account Admin.
Do you want to create a custom role?
Custom roles are available on Premium and Enterprise plans. Before adding a team member, consider whether our standard workspace roles meet your needs. If not, create your own custom role THEN proceed to add a team member and assign the role.
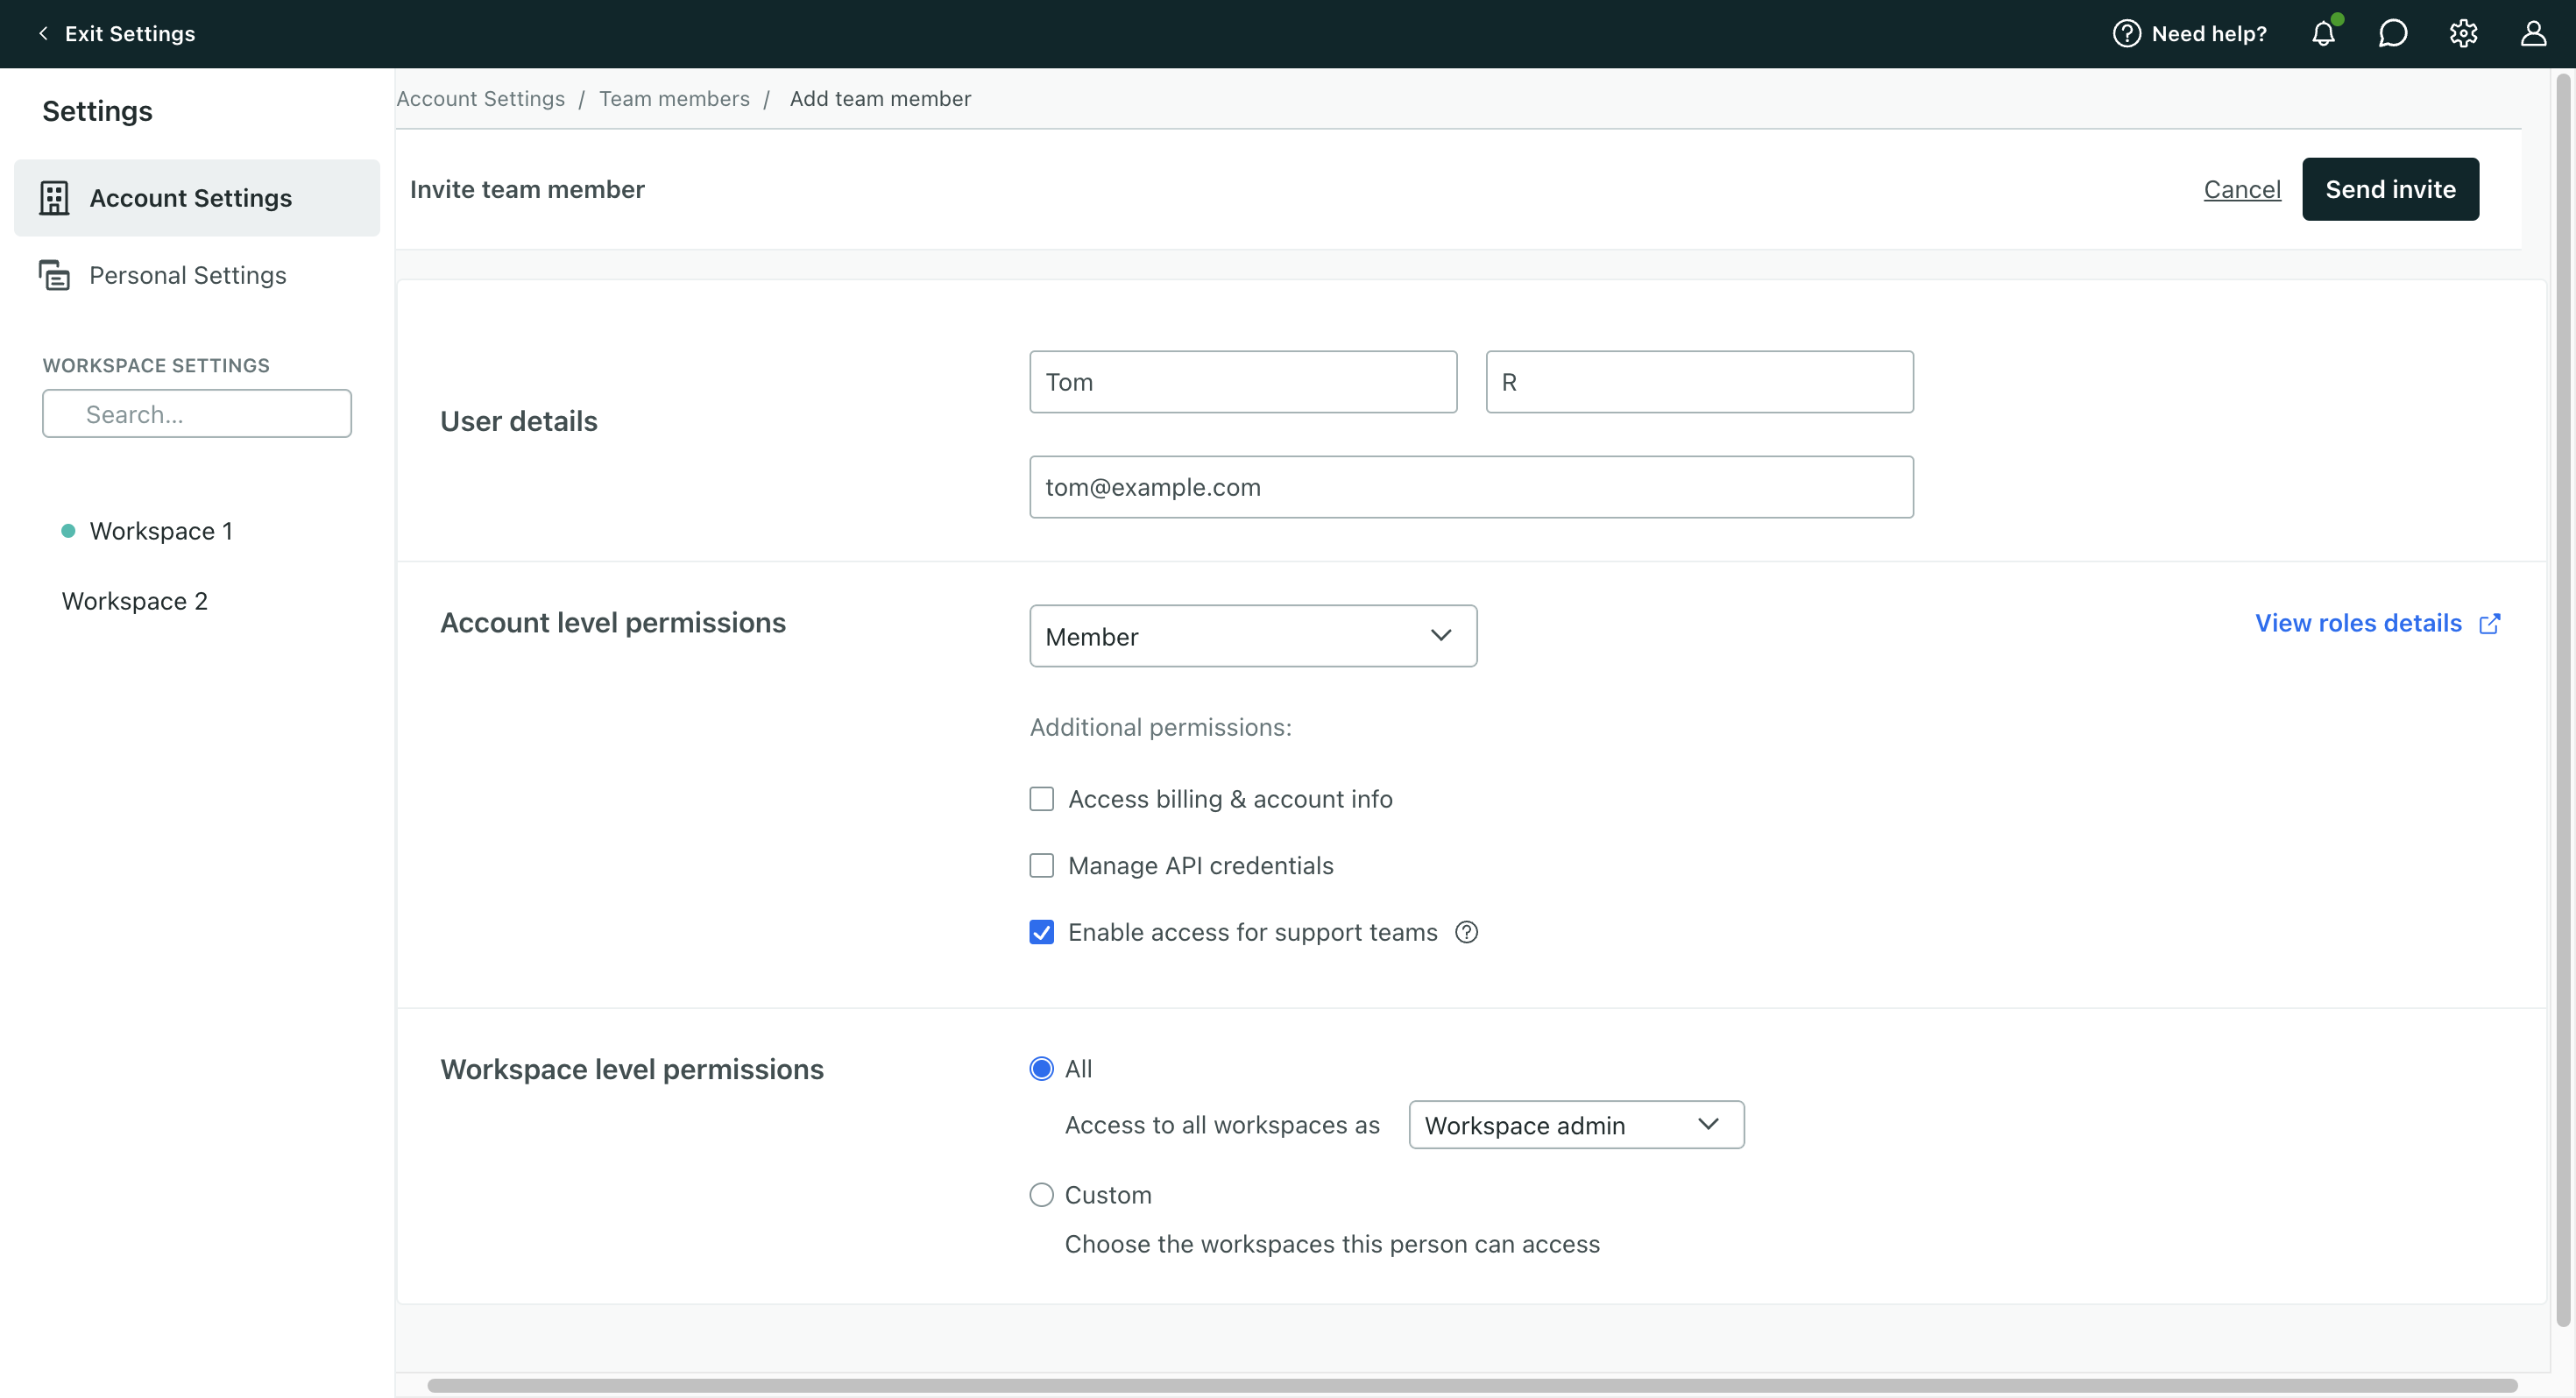
Enter the new team member’s first name, last name, and email address. An email address can only belong to one account, but team members can switch between accounts if they have logins for multiple accounts.
Grant account-level access. By default, we assign team members the Member role. Members cannot manage team members or cookie settings, but you can optionally grant them the following permissions:
Access billing & account info
Manage API credentials
Enable access for support teams
If this team member should have access to all account settings and workspaces, choose Account Admin instead of Member.
If you’re adding a Member, decide how to grant workspace-level permissions. You can assign them one of these standard roles to each workspace: Workspace Admin, Author, or Viewer. If you created a custom role, you can also assign that here.
Choose “All” if you want to give this team member the same access across all workspaces. Then select the role from the dropdown.
Choose “Custom” if this team member should have different roles across multiple workspaces.
Check the box next to a workspace then choose a role from the dropdown. For Authors and Viewers, decide whether to hide attributes. You can also assign the same role to multiple workspaces at once.
Click Send invite.
You’ll see the team member you just created. Their last login will show as “Invite sent” until they log in.
Your new team member will receive an email with a link to set a password. The link in the invitation expires after seven days. When the new team member sets their password, they can log in and get started with Customer.io! Note, if you’ve enabled SSO, they will not have to set a password.
Start from another member’s permissions
When you invite a team member, you can copy an existing member’s role as a starting point instead of setting individual permissions by hand. In the invite panel, use Match permissions from another member and search for a member by name or email. We copy that member’s account-level role and workspace roles onto the invite, and you can adjust permissions before you send the invite.
This copies permissions once—it doesn’t link the two team members, so later changes to one team member won’t affect the other. You can only match a native team member’s access, not a guest team member’s permissions.
Assign the same role to multiple workspaces at once
You can assign or remove a role across multiple workspaces for a single team member. You cannot assign roles and permissions across multiple team members at once though.
Click Invite team member to add a team member or click then Edit to modify an existing member.
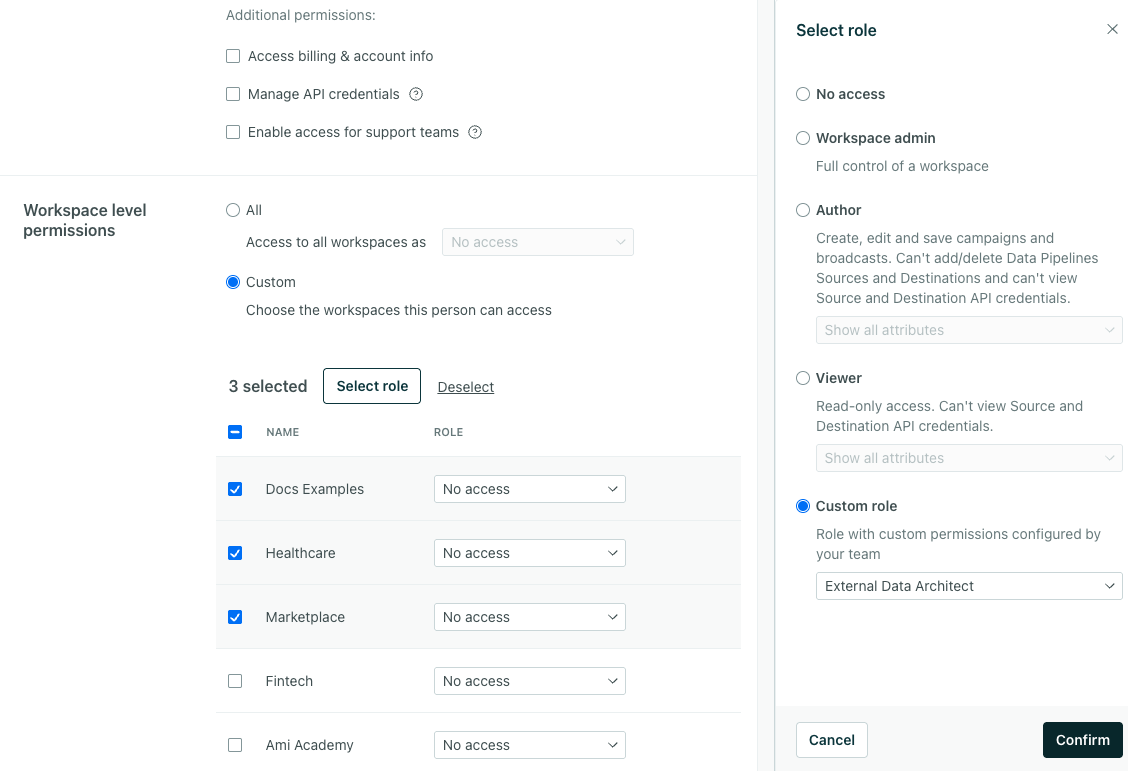
Locate workspace-level permissions at the bottom. Select Custom.
Select the workspaces you want to assign the same access for.
Click Select role. In the panel, select the role. For Authors and Viewers, decide whether to hide sensitive attributes. You can also assign “No access.”
Click Confirm. The table will update to reflect your selection.
Click Send invite or Save.
If you created a new team member, they’ll receive an email invitation. If you updated a team member, they will not receive an email.
Invite a guest
A guest is a team member who signs in with their own Customer.io login from another account. This could be someone from an agency, a contractor, or a teammate on a separate account. For more about guest access and account switching, see Access multiple accounts.
To invite guests, you must be an account admin. The user you invite must already have their own Customer.io account.
Enter the email the guest uses to sign in to their existing Customer.io account and their name.
Set their account-level and workspace-level access, the same way you would for any team member. Non-admins need access to at least one workspace.
Click Send invitation.
The guest gets an email with a link to accept. When they accept, they join your account with the permissions you chose and can switch to it from the account switcher using their existing login. Invitations expire after seven days. See Invite a guest for more details.
Manage guest invitations
Pending guest invites appear on the Team Members page with a Guest label and a Guest invite sent status until the guest accepts. You can filter the list to guests as well.
Resend — click then Resend invitation. This sends a fresh link and invalidates the earlier one.
Revoke — click then Revoke invitation to cancel a pending invite.
Remove an accepted guest — delete them like any team member. This removes their access to this account but leaves their own login and other accounts intact. See Remove a guest.
Approve requests to join your account
When someone signs up for Customer.io with a work email with a domain that matches your account, they can request to join your account instead of creating a new account. This helps you avoid duplicate accounts and keep your team in one place. This requires a paid plan.
You must be an account admin to approve these requests, and you’ll have the ability to choose the person’s access before they join—just like you would when you add a team member.
How someone requests to join
When a new team member signs up and verifies their email address, we automatically offer to connect them to your team instead of finishing a new account as long as the email domain matches your account. The new team member can enter their name and request to join your account or they can continue creating a separate account if they’d rather not join yours.
If the domain matches more than one Customer.io account, we direct the request to the account with the largest team, breaking ties by most recent sign-in. (The person doesn’t pick from a list.) If we can’t determine the account that the domain belongs to, we don’t offer the user the option to join an existing account. But you can still invite the person to join your account through a regular invitation instead.
Review a request
Pending requests appear on the Team Members page with a Join request label.
Decline to reject the request. We don’t notify users when you decline their requests. We just remove them from the list.
Set their account-level and workspace-level access. These are the same choices you make when you invite a team member.
Click Approve request. We add the new user to your team and email them a link to set a password unless you’ve enabled SSO.
A request stays open for seven days. If you decline it, the person can request to join again once that window passes. If you decline a request in error, you can add them manually.
On the right, click then choose Edit and make your changes.
Click Save.
Changes to permissions take effect immediately. If you reduce someone’s permissions while they’re logged in, they may lose their work. For instance, if a team member is logged in as an Author and editing an automation, then you assign them a Viewer role, they could lose unsaved changes to the automation. Make sure you communicate with your team before editing their roles.
Delete team members
To delete or remove a team member, you must be an Account Admin.
You might need to remove team members if they leave your organization. Removing a team member does not impact content in your account—anything a team member did as a member of your account will remain after you remove them from your team. If you only need to change someone’s settings—their name, email address, roles, or the workspace(s) they have access to—you can edit the team member instead.
Find the team member you want to remove. Click then Delete.
Confirm the action.
Export team members
To help you audit access to your account, Account Admins can export a list of team members and their level of access to each of your workspaces.
Click Export to CSV at the top of Team Members. We’ll log this action in Exports of the first workspace created in your account (not necessarily the workspace you just accessed). You’ll also receive an email to download the CSV.
Reset a team member’s password
If a team member forgets their password or their password is compromised, you can reset it on behalf of a team member.
Find the team member whose last login shows “Invite sent”. Click then Resend invitation.
The Resend invitation option only appears for team members who haven’t accepted their invite yet.
Having trouble accepting an invitation?
Did you create a trial account under your email address or did you previously belong to a different Customer.io account?
Your email address can only belong to a single account in Customer.io. So, before you can accept the invitation, we need to free up your email address.
If you created a trial account under your email address, cancel your trial.
Contact us to disconnect your email address from the trial account.
Why can’t I see all of our team members in my list?
Account Admins see all team members. Members only see team members assigned roles in one or more workspaces they have access to.
Why can’t I see all of our workspaces in my list?
Workspace Admins, Authors, Viewers, and teammates assigned custom roles only see the workspaces they can access. Ask an Account Admin to add or remove workspaces from a team member’s list.