A one-time send is a single message that you send to a group of people at once. One-time sends make it easy to broadcast a single message to a wide audience at a predictable time without setting up an automation workflow.
How it works
A One-time send is a single message that you want to send to a group of people. You can schedule a one-time send or send it immediately, providing a simple way to broadcast a message to your audience without setting up a complex automation.
You might send a broadcast to alert your audience to changes in your terms of service, or to a group of people when you onboard people belonging to an account.
Set up a one-time send
The steps to set up a one-time send are fairly simple, but each step includes settings that we’ve explained in the sections below.
You can send a broadcast for any channel— email, in-app, push, SMS, or webhooks. Select your channel of choice to begin.
While most channels are self explanatory, you can select Webhook to “broadcast” requests to your webhook server for each member of your audience. You might do this to trigger in-app messages or messages from a service outside Customer.io. When you elect to broadcast webhooks, you can personalize the URL or payload for each member of your audience using liquid
If you haven’t set a Send rate, we issue requests to your webhook server as quickly as we can. Make sure that your webhook server can handle the spike in traffic from a broadcast or set a send rate to limit the number of requests we send to your webhook server at a time.
Set up an A/B test
You can add an A/B test to evaluate variations of your message and find the one that most resonates with your audience. You’ll set up a test and send it to a sample percentage of people. After you send your broadcast, you can track variation performance and send the most successful version to your remaining recipients.
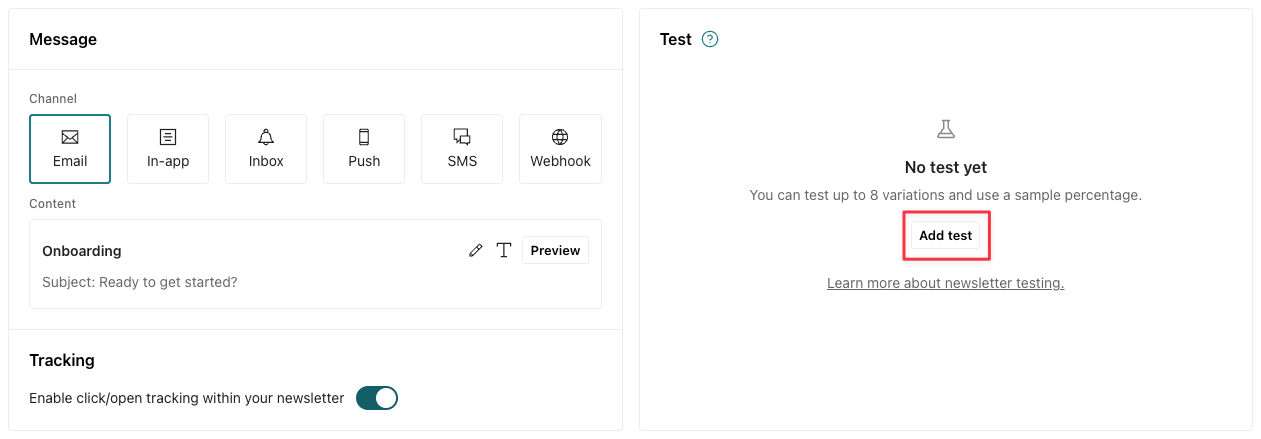
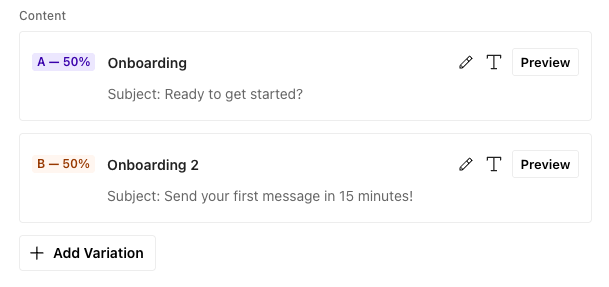
Click Add test in Content step to set up an A/B test. You can send your tests to a sample percentage, and automate sending to the rest. Adding a variation will copy your first message, so tweaking one variable of the message should be easy!
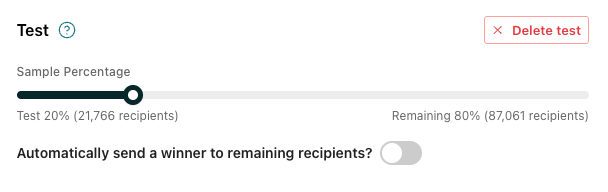
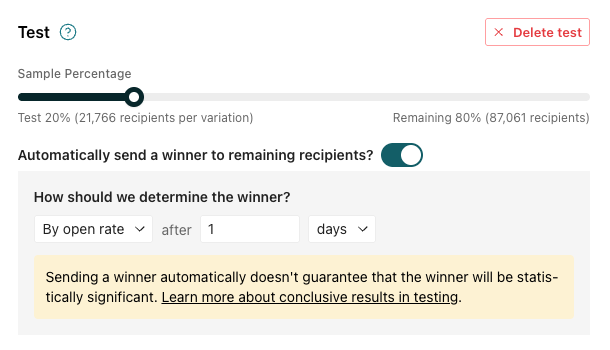
Set your Sample Percentage: this is the percentage of recipients in the test. After the test, you can send the best-performing variant to the rest of your audience.
Let’s say you want 20% of recipients to receive one of two emails with different subject lines. A randomly selected 10% of people will receive each email, and you can choose to automatically send the one which performs better to the remaining 80% once the test is over. Start by setting the Sample percentage to 20% using the slider.
A/B test variants are split evenly within the sample
You can set the Sample Percentage anywhere from 1–100%. Within that sample, recipients are split evenly across your test variants (2 variants = 50/50 each; 4 variants = 25% each, and so on)—there’s no option to weight individual variants unevenly.
Click Add variation to create the messages you want to test. While you can test anything, we recommend that you only change one variable per test to produce a reliable test. You can add up to 8 variations.
Use a statistically significant test audience
Results are most reliable when you have at least 500 recipients per variation. With fewer recipients, your test may not produce Conclusive Results.
(Optional) Enable Automatically send winner to remaining recipients to send the winning option to your audience as soon as we decide the winner. Select the metric you want to use to decide the winner and how long the test should run before sending it to the remaining recipients.
You must choose a winner within 7 days of activating your one-time send.
If you’re manually choosing a winner, make sure you do so before the week is up. Otherwise, you won’t be able to select one and send to your remaining recipients. This limit helps reduce load times for metrics.
Find the results of your test
When you send your broadcast, you can start to monitor the results of your test on the Test tab of the broadcast’s Overview page.
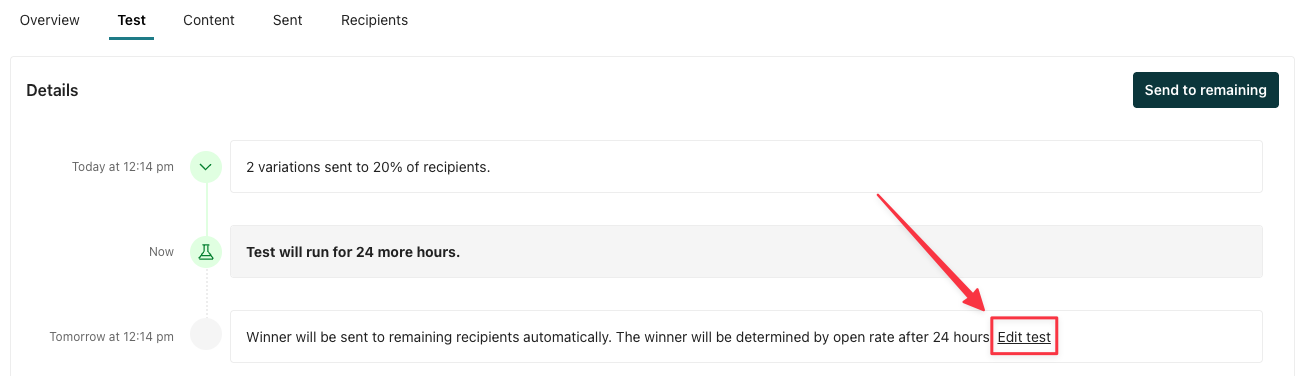
From here, you’ll see the current metrics for each variation, with the metric chosen to track the winner in bold. The Details section of the page shows the timeline for the test:
When you first sent the message
To what percentage of your recipients
How much longer the test will run
When the winning message will be sent to the remaining recipients.
Modify your test
If you want to change how the winning variant is evaluated, go to the Test tab.
Under Details, click Edit test.
After you turn off “Automatically send winner”, you can’t turn it back on. You have the option to send to your remaining recipients manually.
Send to remaining recipients manually
If Automatically send winner to remaining recipients is off, you can manually determine the “winning” test and send it to your audience.
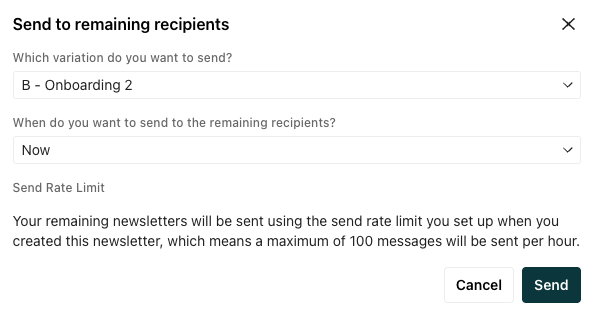
When you have conclusive test results, go to the Test tab and click Send to remaining. Then choose the variant you want to send and when.
Recipients
You can send a broadcast to everyone in your workspace or narrow your audience down:
Specify conditions they need to match
Add a list of recipients via CSV
Check the estimated count of recipients to make sure the volume matches your expectation. Click View list to see the list of expected recipients.
People matching conditions
On the Recipients step, you decide who will receive your message. If you select, “People matching conditions,” then you can define who will receive the message based on one or more segment, attribute, or message conditions.
Segment condition
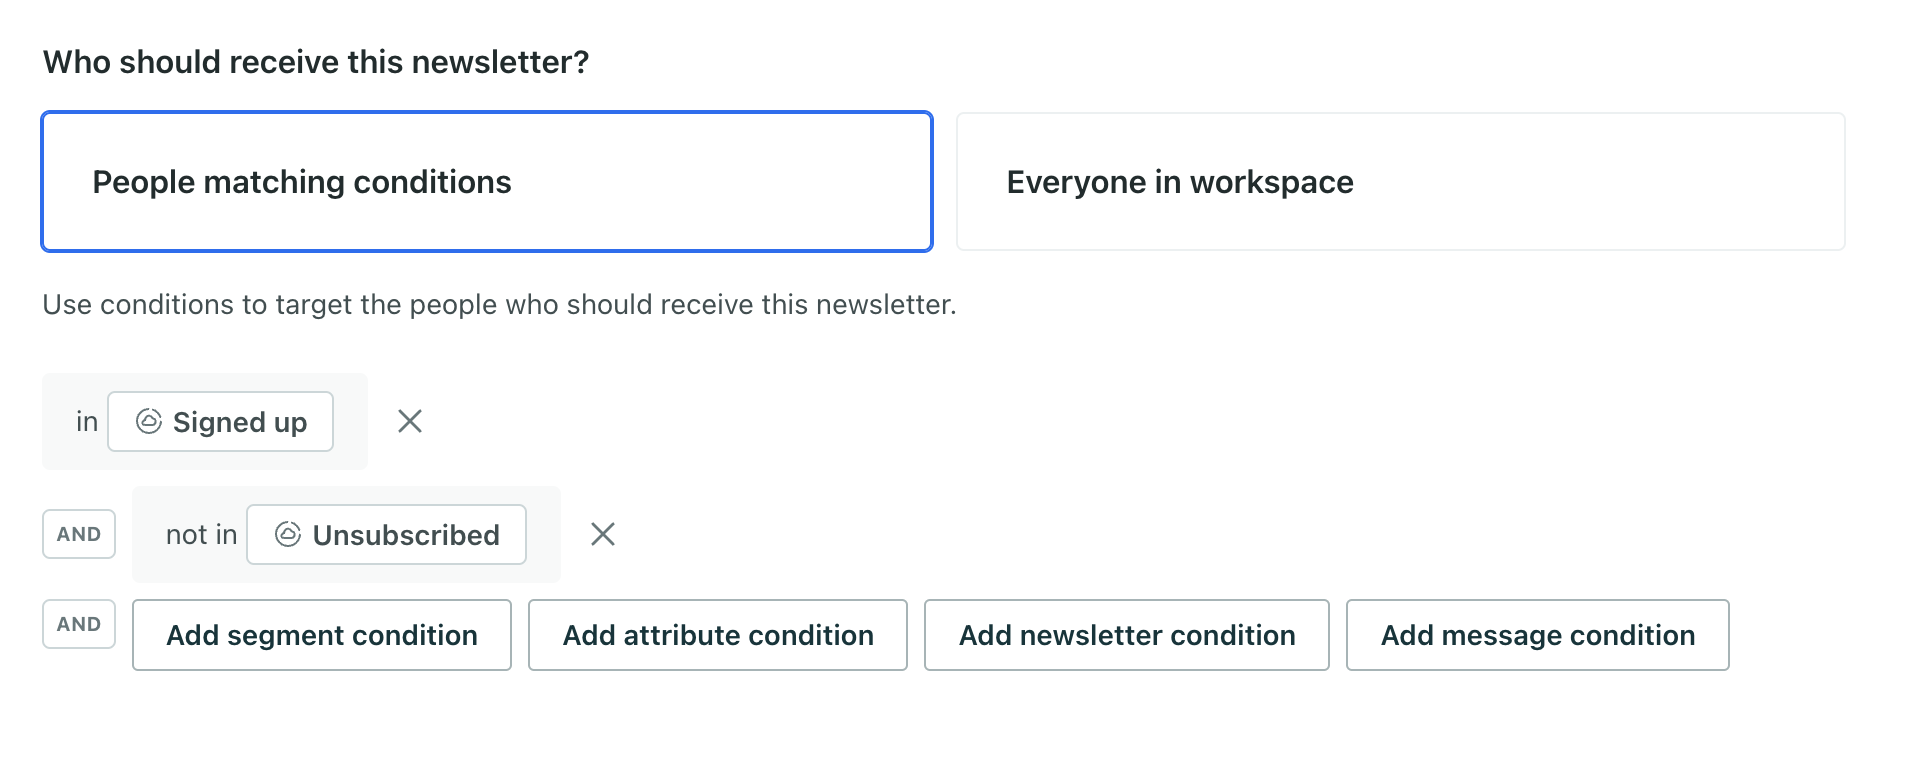
People will receive your message if they belong or don’t belong to specific segments. Filter for people IN or NOT IN segments and join conditions using AND or OR logic.
Here’s a walkthrough of setting up a segment condition:
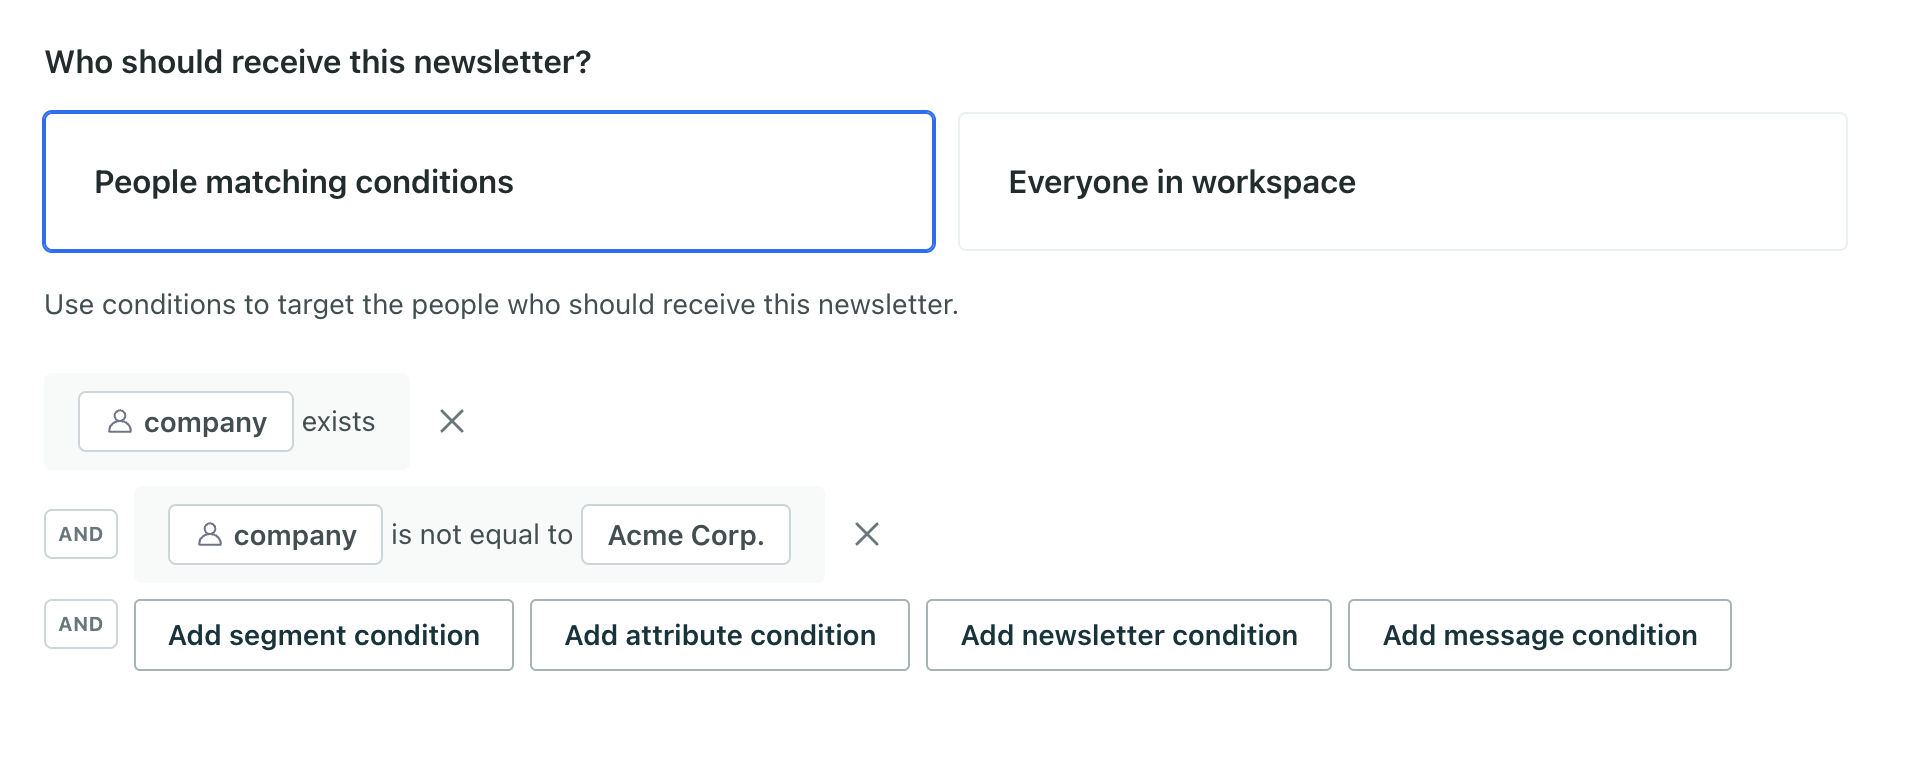
attributes meet these conditions. You can filter for people whose attributes exist, don’t exist, are equal to, or are not equal to a value.
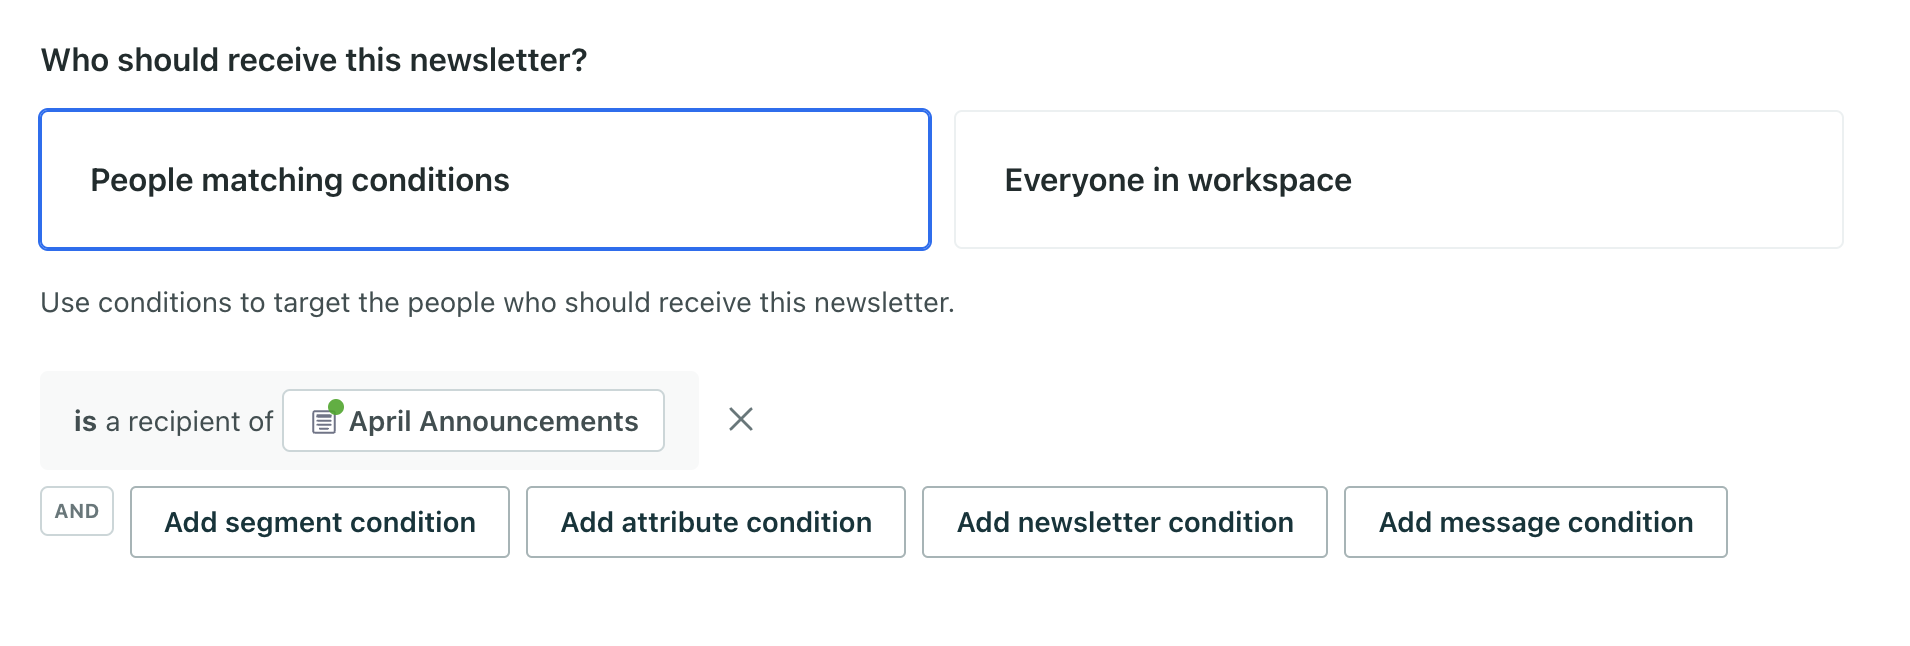
One-time send condition
People will receive your message if they previously received one or more messages.
One-time send status indicates if it's been sent
If you select a one-time send as a condition, you may see a green or yellow dot on the one-time send icon. This is a “status” indicating whether the message has been sent (green) or drafted (yellow).
Message condition
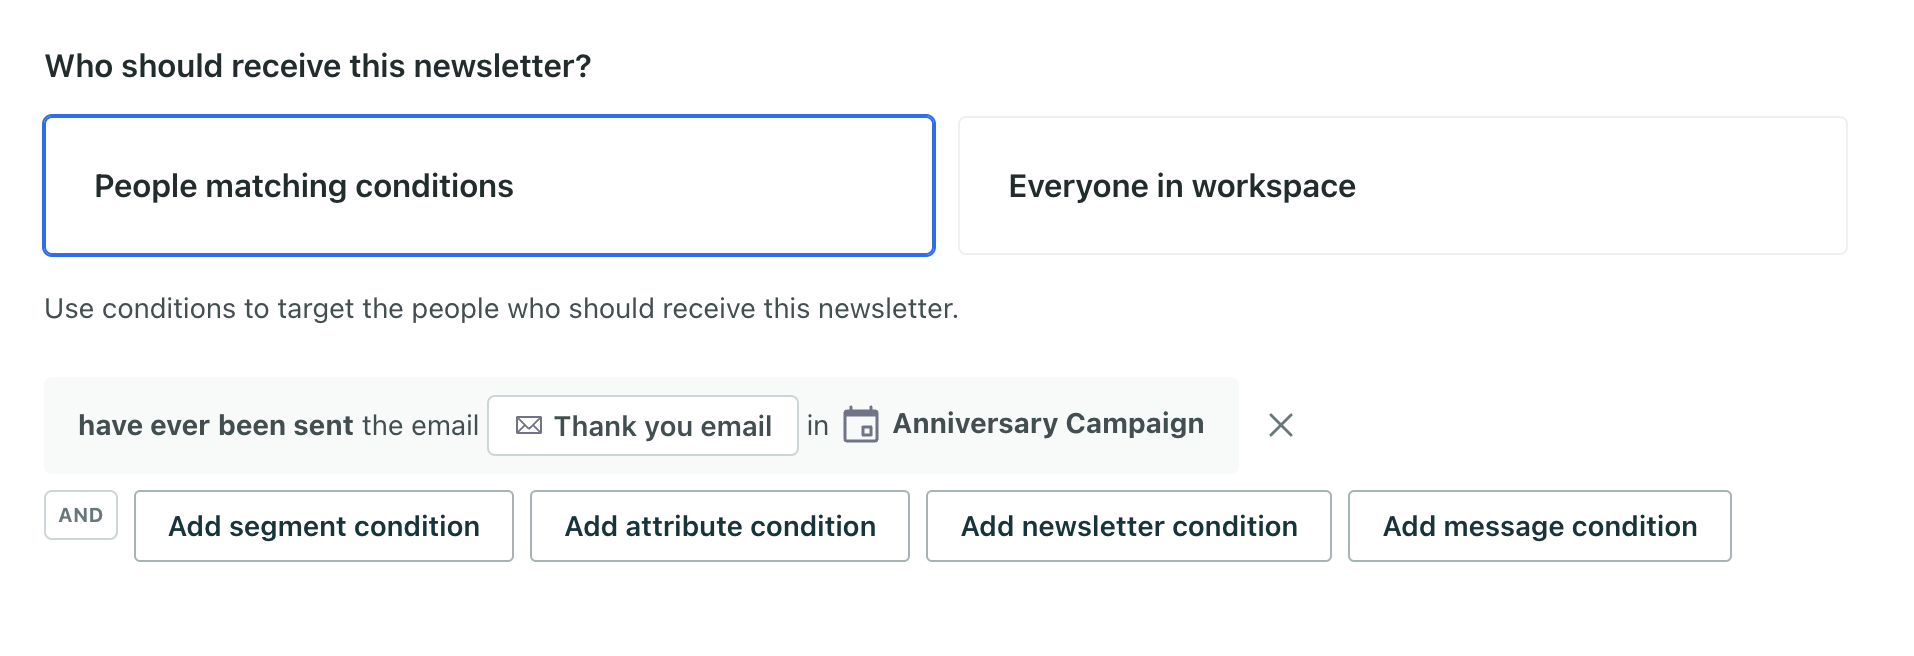
People will receive your message if they meet conditions related to any message in your workspace, like:
people have never been sent any in-app message
people have ever been sent the email “Thank You email” in “Anniversary Automation”
Import recipients
You might import recipient via CSV for the following reasons:
You want to send the message as quickly as possible—assigning recipients by CSV upload means you bypass the time it takes to calculate audience conditions.
You can’t narrow down your complete audience by shared conditions.
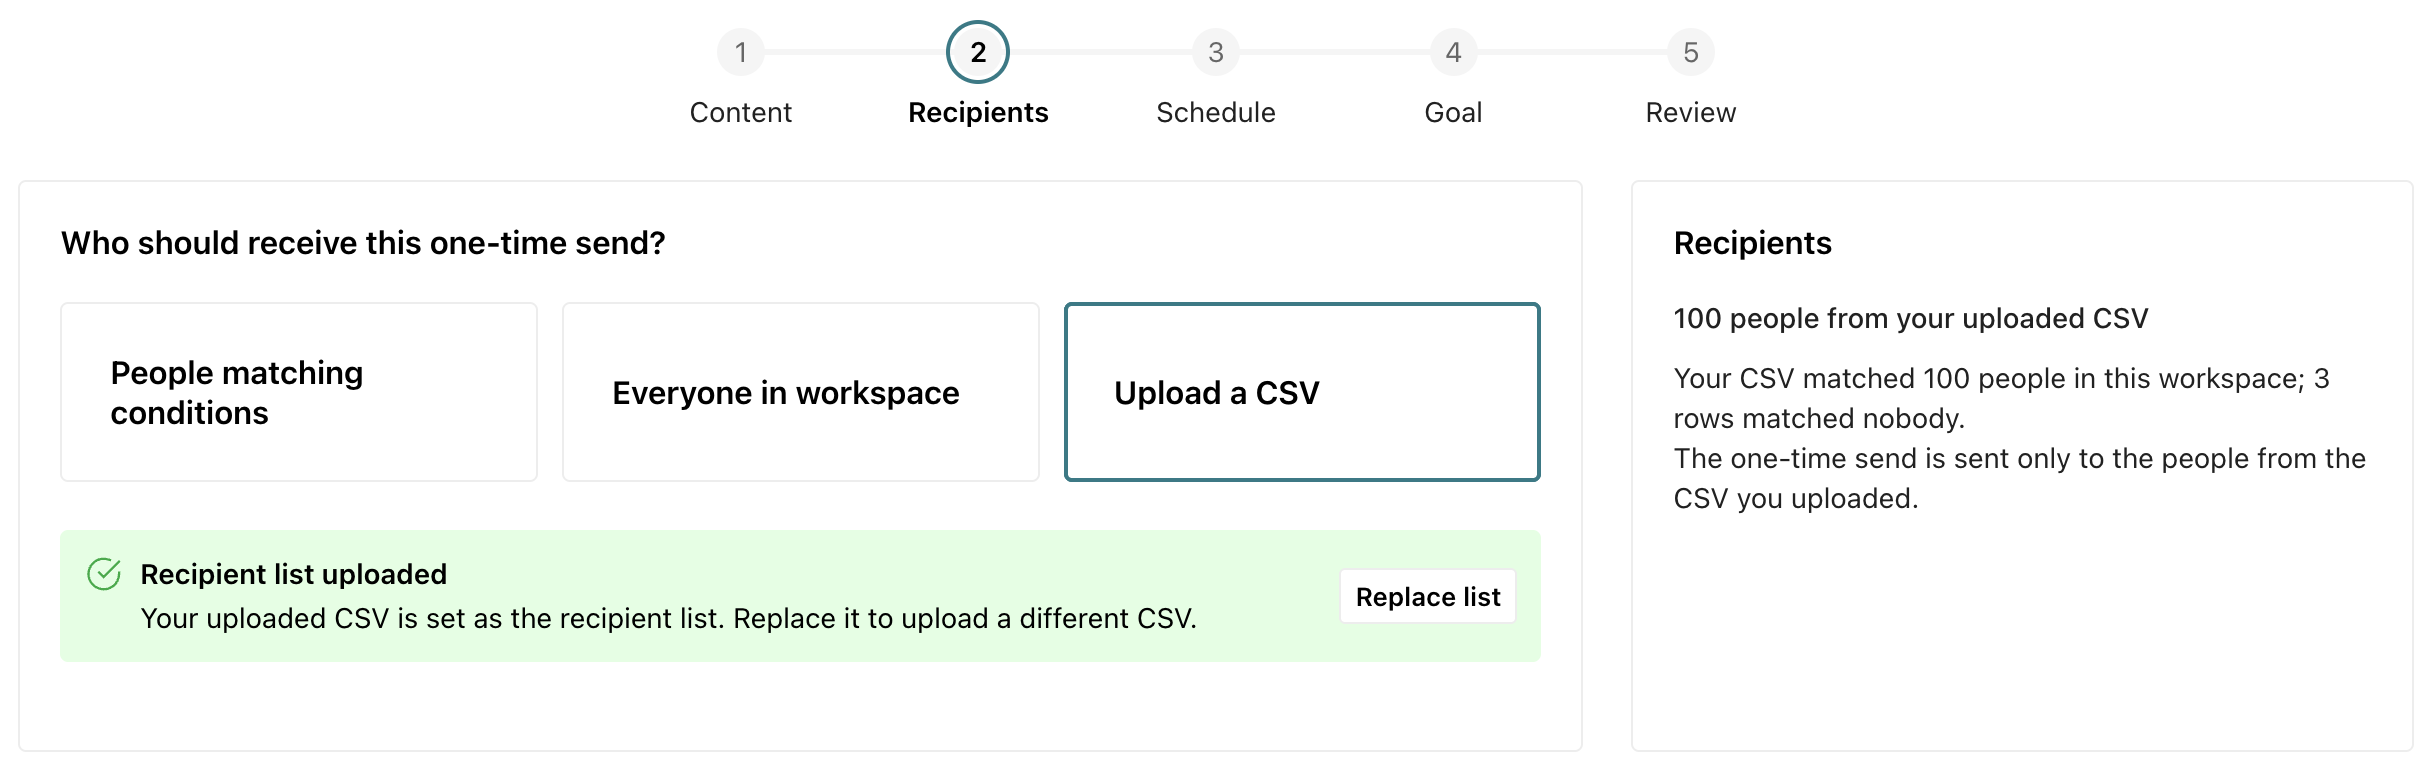
Instead of choosing to narrow your audience down by conditions, select Upload a CSV.
Your CSV must follow these rules:
Size: no larger than 100 MB.
Contains a single email or id column that identifies people who already exist in your workspace. You can’t add new people to your workspace through this CSV. Learn more about importing new people.
The import ignores any other columns; you can’t update your audience’s data through this upload. The import also skips rows that don’t match an existing person, instead of failing the import altogether.
Email: Skip duplicate addresses
If your workspace is ID only, multiple people in your workspace can have the same emailattribute
. The Skip duplicate email addresses setting prevents you from sending your email broadcast multiple times to the same address. It is on by default.
At your broadcast’s send time, we generate a delivery
The instance of a message sent to a person. When you set up a message, you determine an audience for your message. Each individual "send"—the version of a message sent to a single member of your audience—is a delivery.
for each member of your audience. If this setting is on and a subsequent member of your audience has the same email attribute as someone who already generated a delivery, we will skip that person.
This setting only prevents duplicate deliveries; we do not affect your audience in any other way. For example, we don’t modify the Is a recipient segment criteria for your message—all of the people in the original audience, including people with duplicate email addresses who were skipped, will join the Is a recipient segment. This helps prevent you from accidentally sending repeat or follow-up emails to someone who already received your message.
Recipient counts do not account for duplicates
Deduplication takes place at send time, so the audience counts you see when you set up your one-time send and A/B test might be inflated by people with duplicate emails in your audience.
While this setting prevents you from sending duplicate emails, you can deduplicate people in your workspace by enabling the email or ID setting, which makes email a unique attribute. This ensures that multiple people cannot have the same email address attribute.
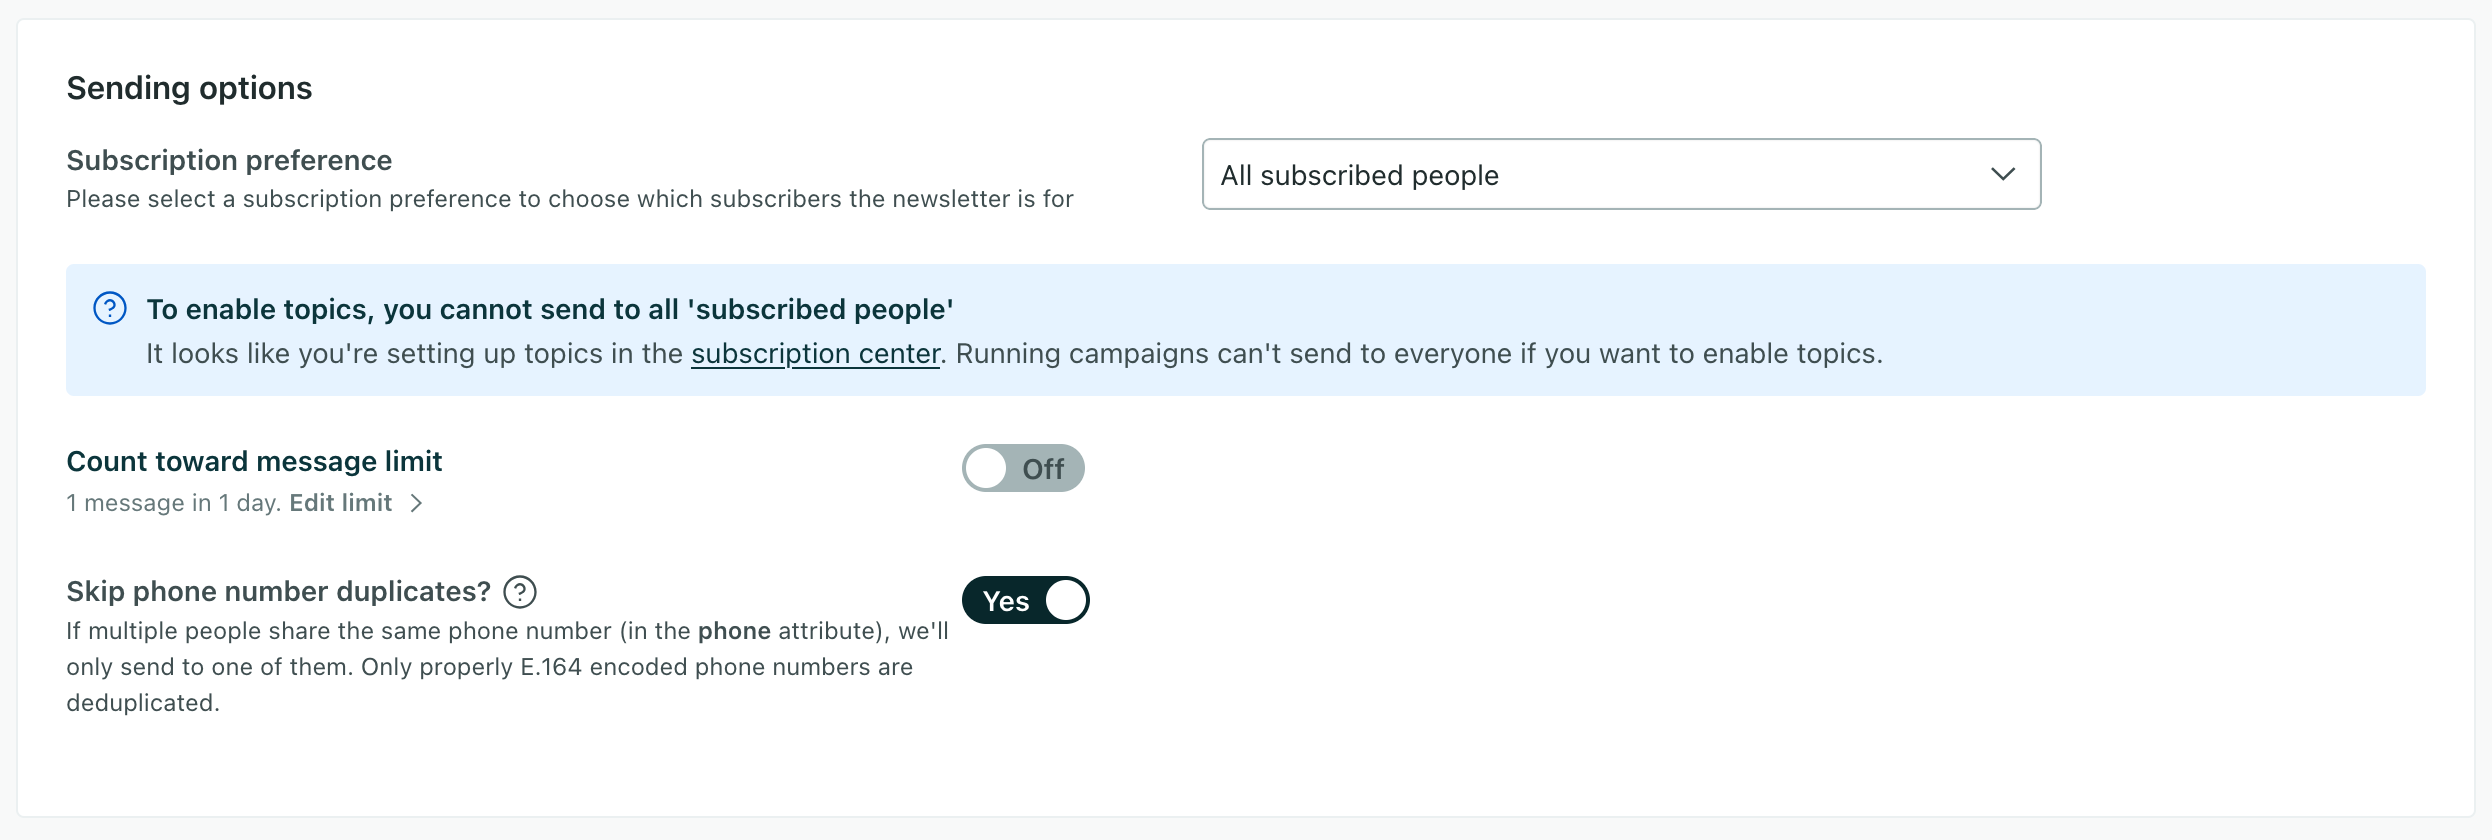
SMS/WhatsApp: Skip phone number duplicates
The phone attribute isn’t required to be unique in Customer.io. If more than one person in Customer.io has the same phone number, you’ll end up sending duplicate outbound messages.
When you enable the Skip duplicate phone numbers setting, and we send a message to a phone number, we’ll ignore any subsequent messages to that phone number.
Set a subscription preference
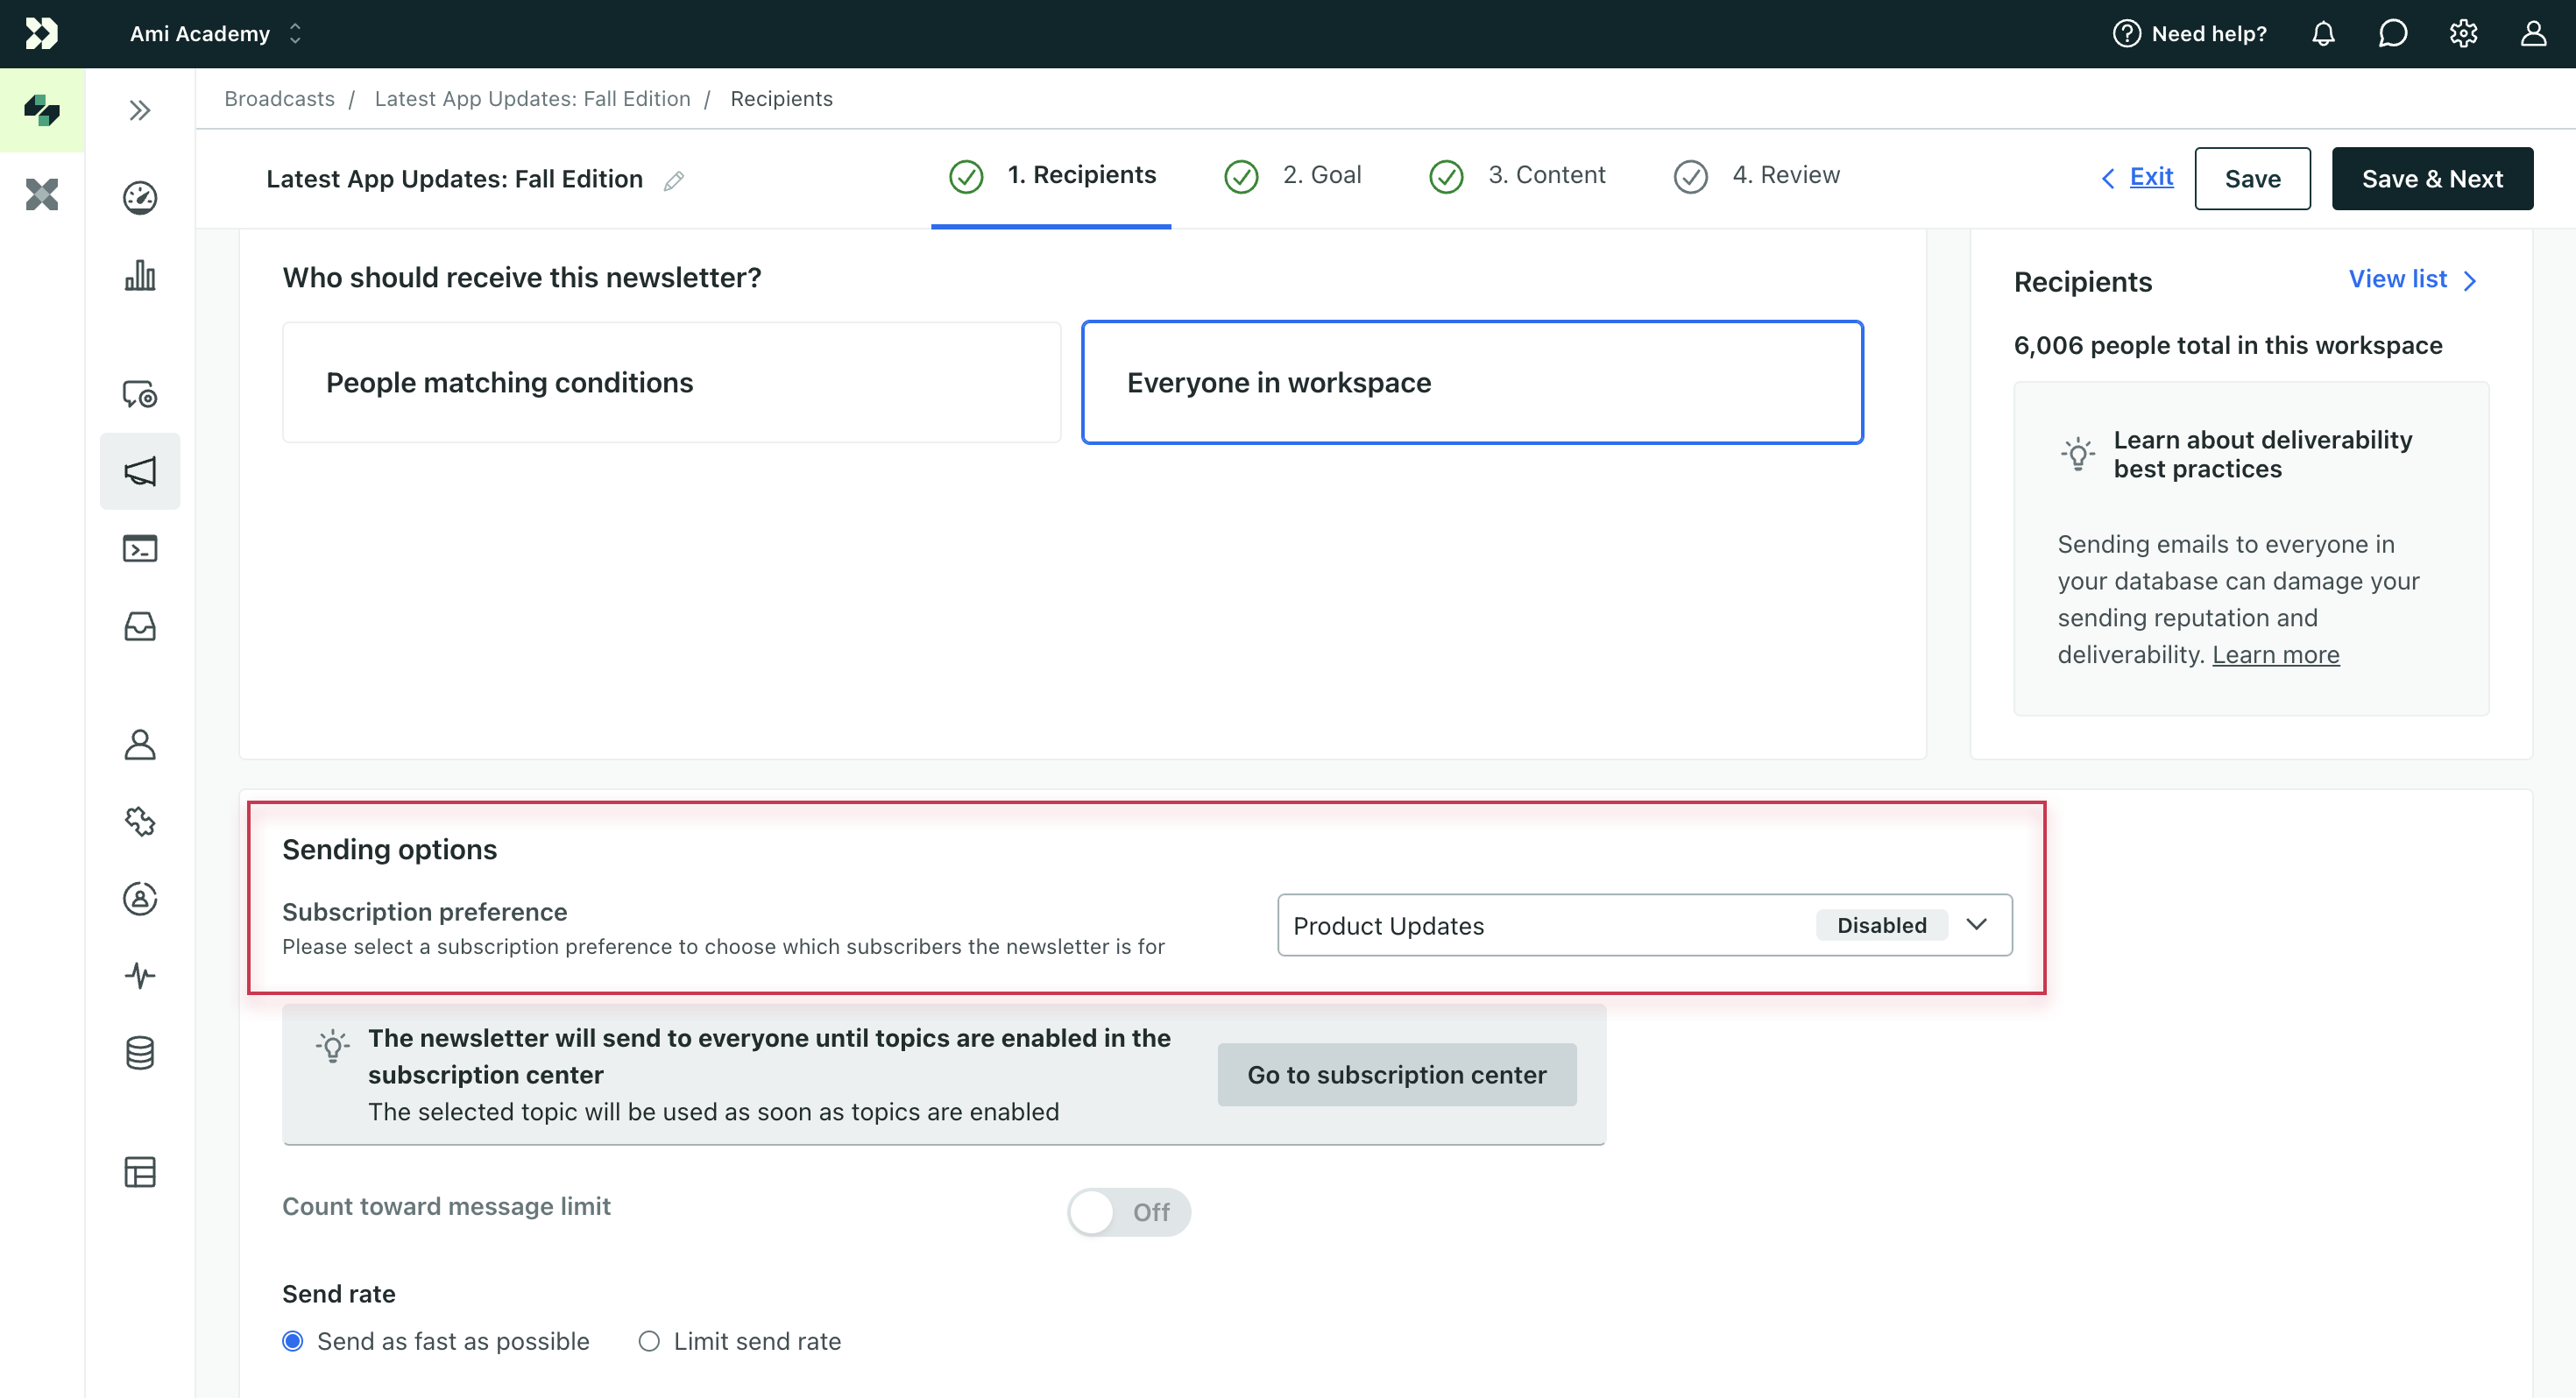
If you’re using our Subscription Center feature, you’ll set your broadcast’s topic
A category of message, set within your workspace's subscription center, that people can subscribe to or unsubscribe from. Topics let your audience determine the kinds of messages they want to get from you.
in the Subscription preference setting. If people are unsubscribed from the topic, they won’t get messages from the broadcast.
If you don’t want to set a topic, you can use the All subscribed and unsubscribed setting. You should use this setting sparingly—for things like transactional-style messages and important notices. Sending messages to unsubscribed people can violate their trust—or even violate local laws and regulations (GDPR, CAN-SPAM, etc)!
Send to unsubscribed users
You can opt to send your message to unsubscribed users—which you might do to notify users of important information like a change to your terms of service or scheduled maintenance. Go to the Recipients tab under Sending options:
Warning
Be careful when sending to unsubscribed people. Continuing to message someone who has unsubscribed could breach anti-spam laws in your country, and we reserve the right to terminate your account if you do so.
Schedule your message
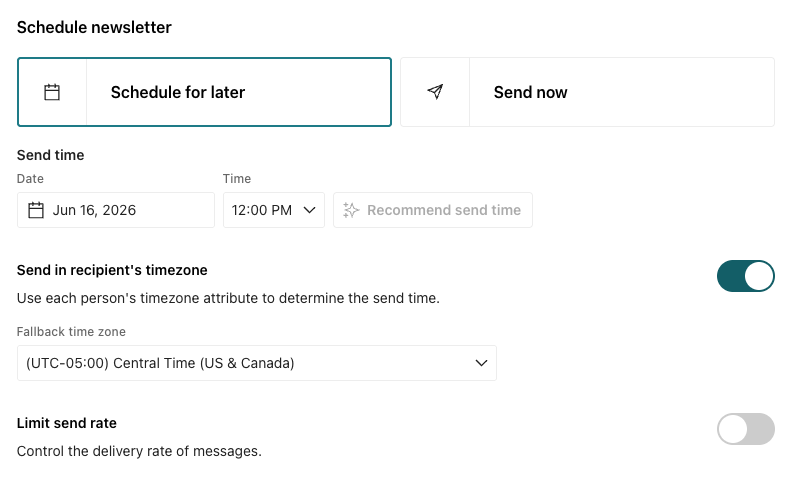
You can send your broadcast immediately or schedule it to send for a future date/time.
Click Schedule for later to set a future time. You should always schedule your message at least 5 minutes in advance, and note that the timezone defaults to your local time.
Did you just update a snippet?
If you just updated a snippet used in your messages, make sure you wait a couple of minutes before activating your workflow to ensure all updates appear in your delivered messages.
We calculate who receives your message at send time, so the audience count you see under Recipients when you schedule the message could differ from the final count we send to later.
Limit send rate
Limiting the send rate is optional. If you don’t set a send rate, Customer.io sends your broadcast as fast as it can, unless new-account sending limits apply to your account.
Setting a maximum rate limit can help you maintain good deliverability. When you limit the send rate, we queue messages for delivery in batch sizes of the number you specify.
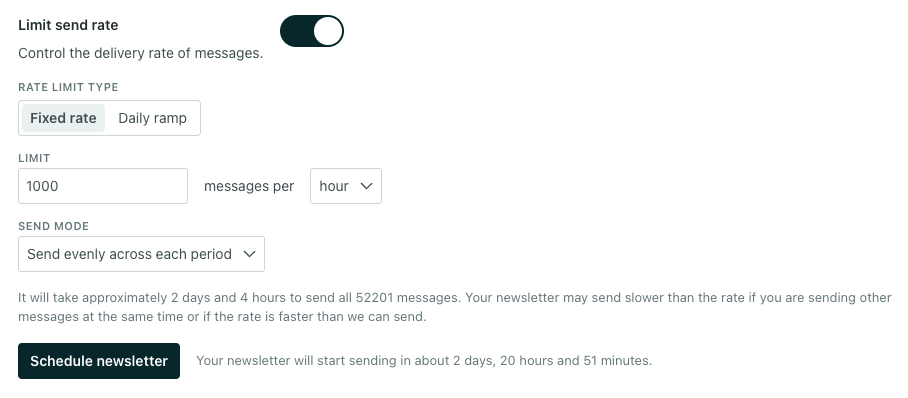
On the Schedule tab, turn on Limit send rate. You can choose between two rate limit types: a Fixed rate or a Daily ramp.
Fixed rate
Choose Fixed rate if you want to send a consistent maximum number of messages per minute, hour, or day.
Specify your Limit: the maximum number of messages and the time period.
Choose your Send mode: send evenly or send as fast as possible.
Sending evenly across each period is the default to protect your downstream systems from getting overloaded. However, you might choose Send as fast as possible up to the limit in each period if your content is time-sensitive or you have automation conditions dependent on this message.
You can use a fixed rate and send your messages in the recipient’s timezone. Each timezone has a local send window—about an hour around the target local time.
If your broadcast sends in a recipient’s timezone AND has a daily fixed rate limit, any messages that fall outside the hour-long timezone window or surpass the rate limit are punted to the next day at the same local time in their timezone. This can repeat across days if the daily cap is too small to drain that timezone in one window. To reach people faster and prevent this spread, increase your daily limit.
When you send in a recipient’s timezone, a per-day fixed rate requires the Send evenly across each period mode. You can’t use a daily rate with the Send as fast as possible option in timezone mode. Per-minute and per-hour rates work with either send mode.
Daily ramp
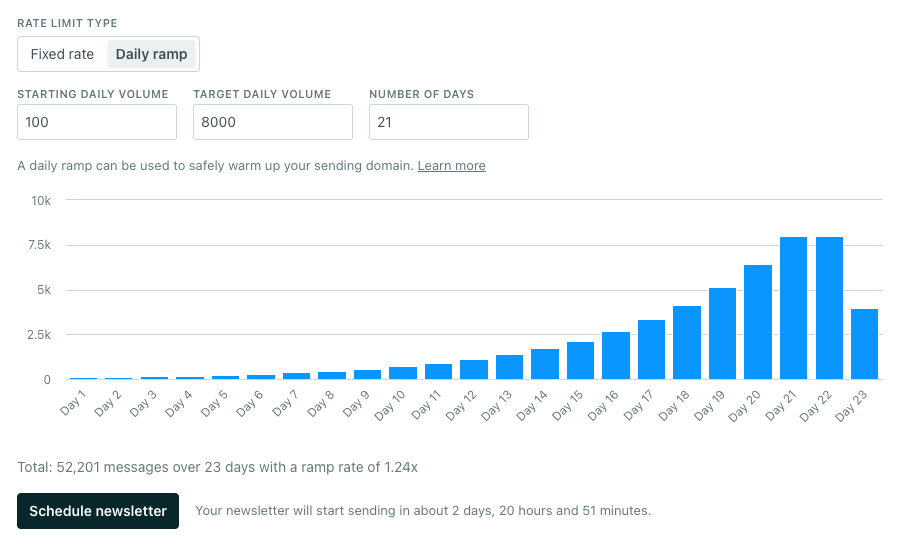
Choose Daily ramp to exponentially increase your send volume over multiple days. This is ideal for domain warming; it automates the manual warm-up schedule so you don’t have to create multiple messages for each day.
When you select Daily ramp, configure the following settings:
Starting Daily Volume: The number of messages to send on the first day. Start with a low number like 100. You can learn more about the recommended ramp-up rates in Domain warming.
Target Daily Volume: Set a target that reflects the maximum number of messages you’ll expect to send on a daily basis. This is the volume the message will ramp up to sending by the end of the period. This is especially important if you’re using this message to warm up your domain. You don’t need to warm it up past your max daily send rate.
Number of Days: How many days the ramp lasts (up to 60). The daily volume increases each day until the ramp period ends or all recipients receive the message. We’ll send across the day, too, not all at once.
If recipients remain after the last day of your ramp, we continue sending at the final day’s rate until all recipients receive the message.
You can use a daily ramp and send your message in the recipient’s timezone. We only send to recipients during their local send window. If a day’s ramp volume runs out before a timezone’s window opens, those recipients roll over to the next day at their local time rather than sending outside their window.
Preview the chart to see the projected daily send volume and make sure your adhering to best practices for ramping. We’ll warn you if your daily ramp might not be optimized too.
After the ramp completes and all recipients have received the message, the broadcast’s status changes to Sent—just like any other message.
Rate limit constraints
One-time sends must finish sending within 60 days. If your rate limit settings would take longer than 60 days to reach all recipients, you can’t activate the message send—adjust your settings accordingly.
If you pause and resume a one-time send during a ramp, it picks up where it left off based on how many messages have already been sent—it doesn’t skip days.
Edit rate limit while sending
You may want to change the rate limit while your one-time send is sending to improve your domain warming outcomes. For instance, if your emails are getting deferred or engagement rates are lower than expected, you may want to slow your send rate. This allows mailbox providers more time to evaluate the traffic.
From your one-time send, click the Recipients tab.
Click Edit rate limit. To edit the rate limit, your message must follow these conditions:
The message state must be Sending.
The message must have a configured rate limit. You can’t add a rate limit if the message is sending as fast as possible with no limit.
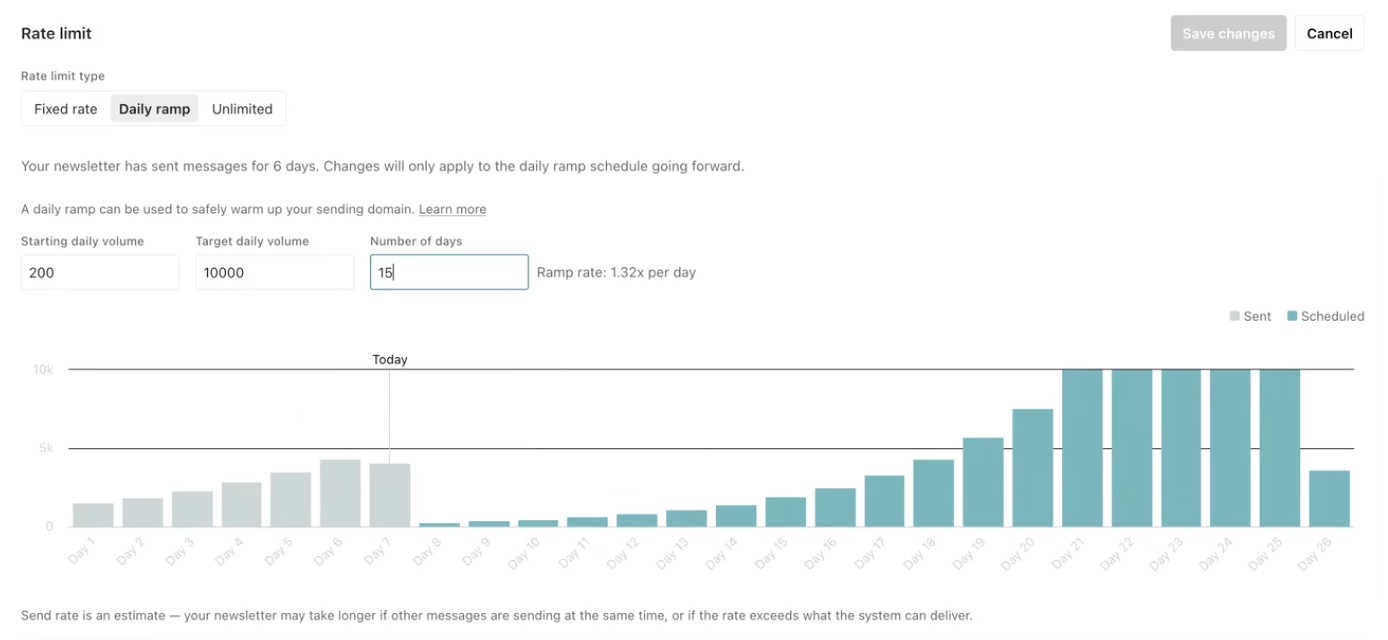
Modify the settings as you see fit. You can change between Fixed rate, Daily ramp, or choose Unlimited to remove the limit.
Click Save changes.
The daily schedule will show the daily rate for the messages that have already been sent followed by the estimated schedule for the new rate limit.
In the image above, notice that the Today marker (Day 7) shows a volume greater than the restart volume (Day 8). When this happens, your one-time send will restart sending the next day, not immediately. Specifically, it will restart in the next 24-hour period, which is based on when your message first started sending. So if your message started sending at 12 PM originally, your message will restart sending after you save your changes and it reaches 12 PM again.
Goal: determine what makes your message successful
You track the success of your one-time send based on whether a person performs an event, enters a segment, or exits a segment after they receive your message.
If a person performs your goal criteria within the time frame you configure, the message
The instance of a message sent to a person. When you set up a message, you determine an audience for your message. Each individual "send"—the version of a message sent to a single member of your audience—is a delivery.
is marked converted. You can set goals to determine the success of your messages, and follow conversion rates over time to improve your message strategies. See Goals for more information about conversions; one-time sends have the same goal options as automations.
We track conversions for the following message/delivery types:
Slack and Create or update person actions are often internal or used for analytics purposes; they don’t always send messages to end-users. For that reason, we don’t attach conversions to them. You can enable webhook conversions on individual webhook actions.
In the Goal section of the workflow, you can decide if you want to track opens and clicks (on by default).
Review your one-time send
After you set up your one-time send, go to the Review tab to activate your message.
Check the high-level view of your settings, content, and schedule. When you’re ready to send, click Send or Schedule at the top.
Pause and resume a one-time send
You may want to pause a one-time send when you notice a typo after sending or need to make some other change to your message. You can pause if the message hasn’t finished sending to all of your recipients. Any messages already sent cannot be recalled, though.
You can't change recipients while your one-time send is paused
When you resume a message, it continues sending to your original recipient list. It cannot account for people who match, or stopped matching, your recipient list while it was paused.
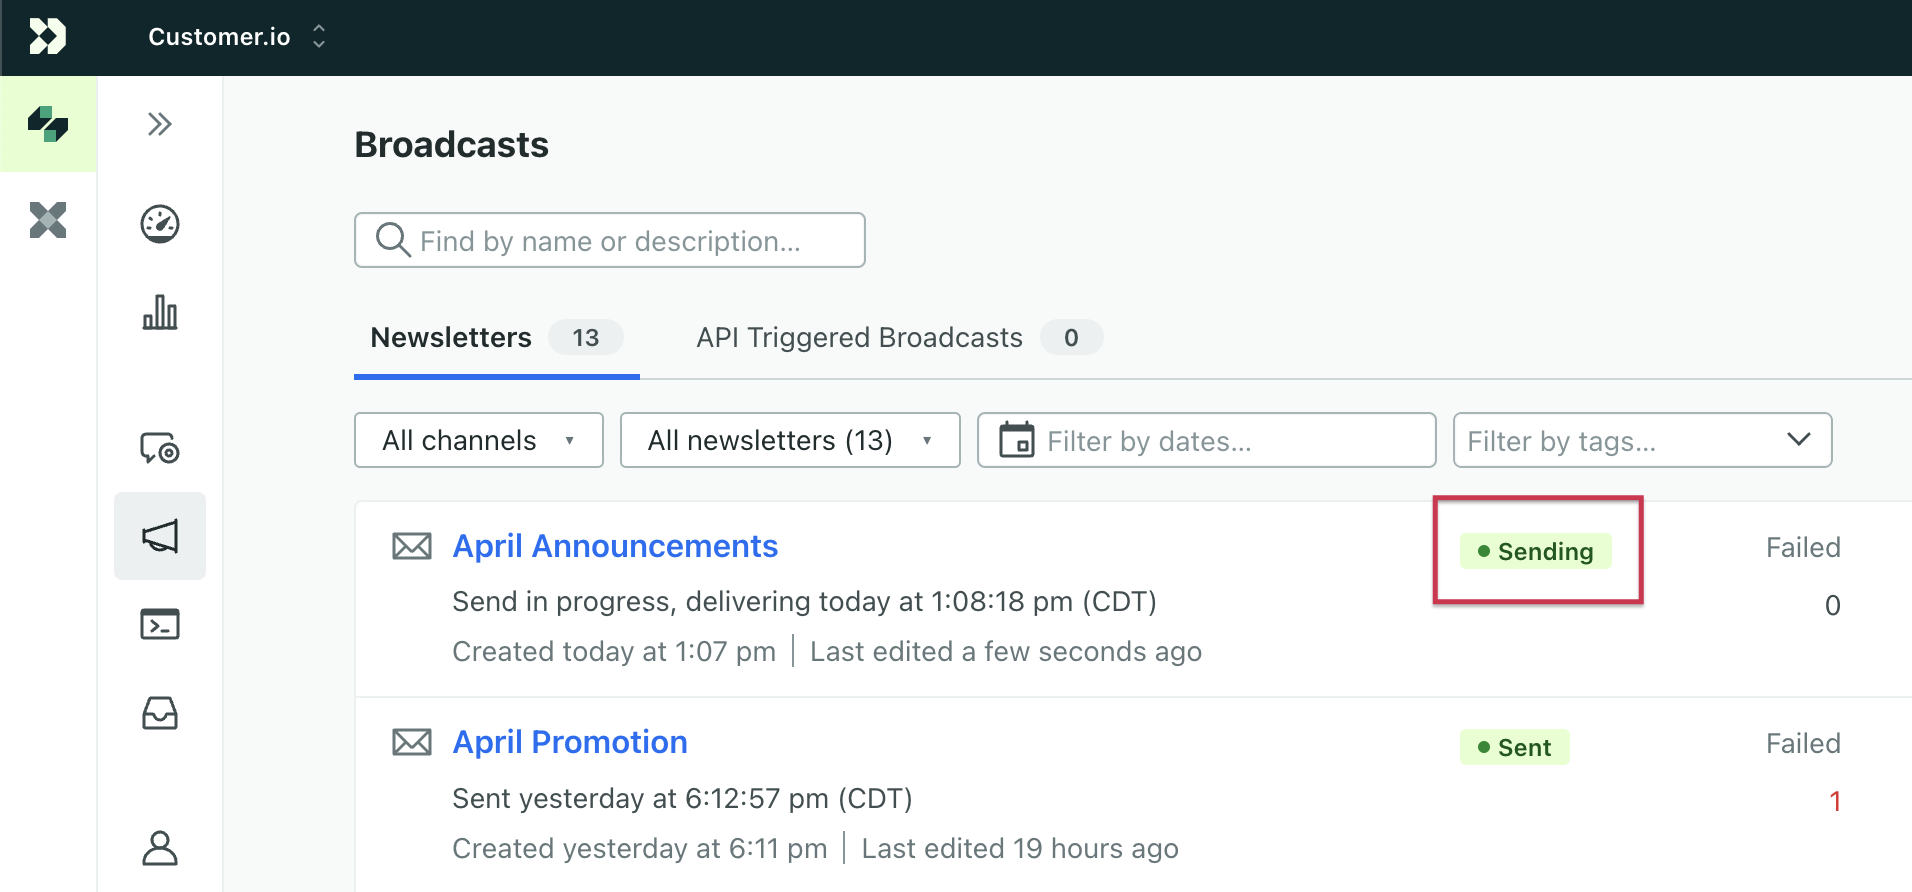
In Broadcasts, click a one-time send with a status of Sending. (If the status is “Sent,” then all recipients have received the message and it cannot be paused.)
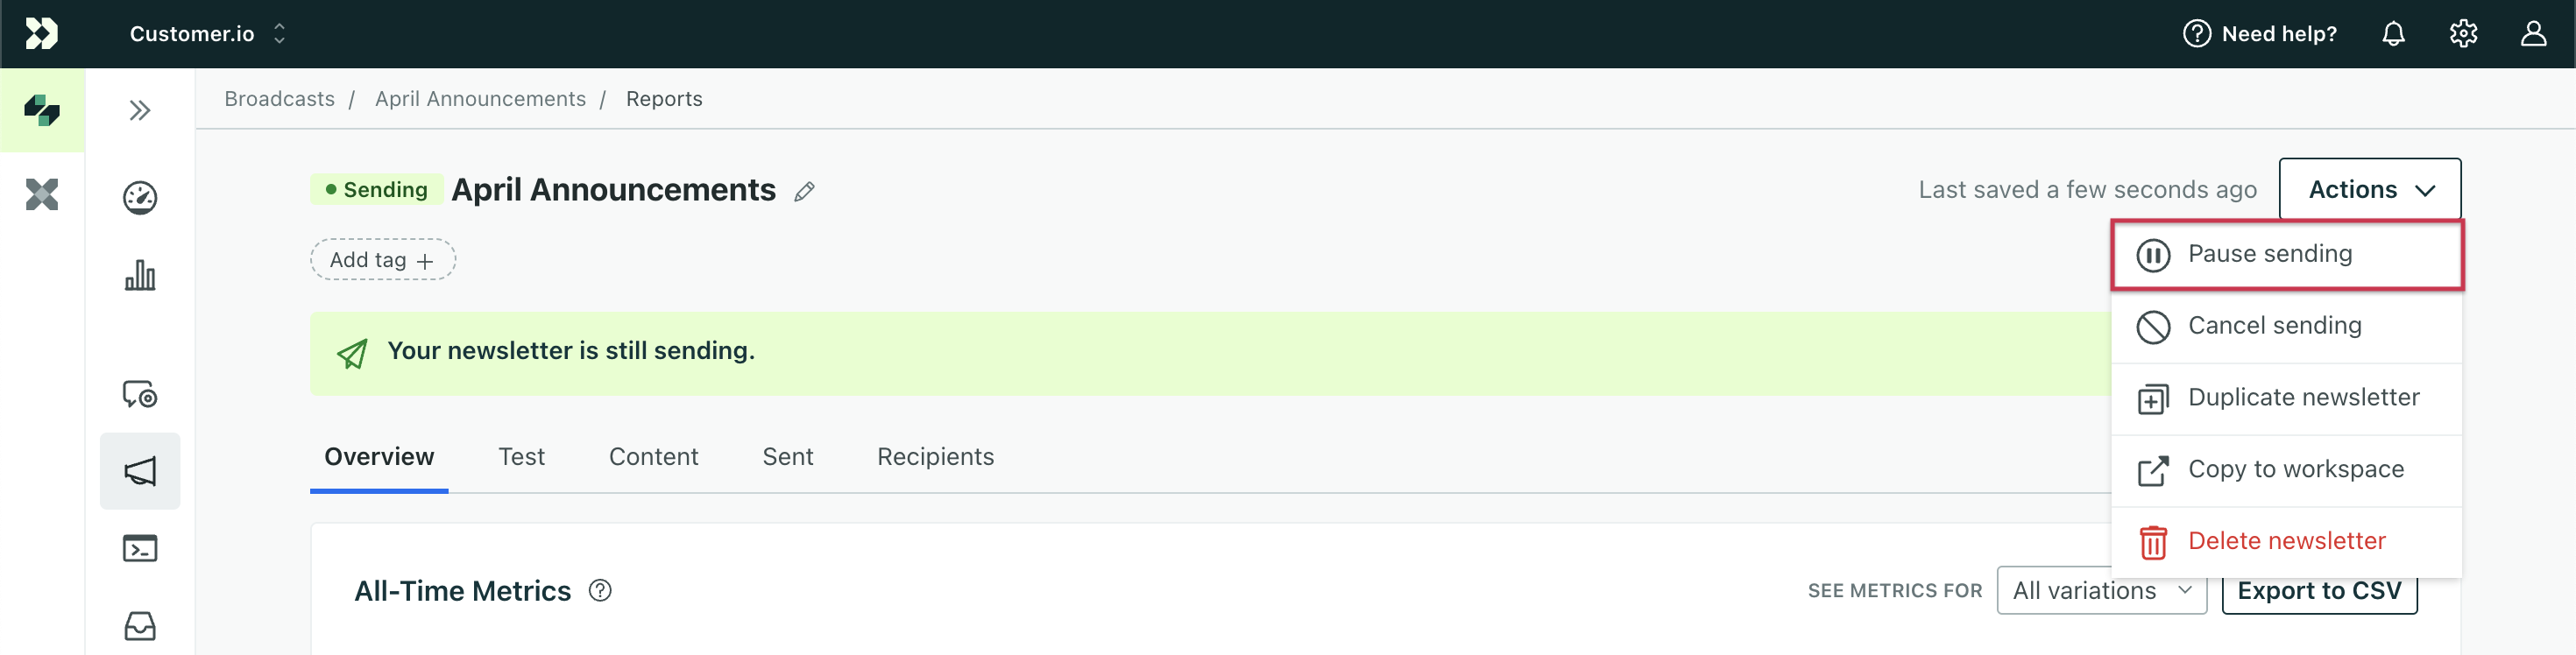
In the top-right, click Actions then select Pause sending from the dropdown. This action immediately pauses any further messages from sending.
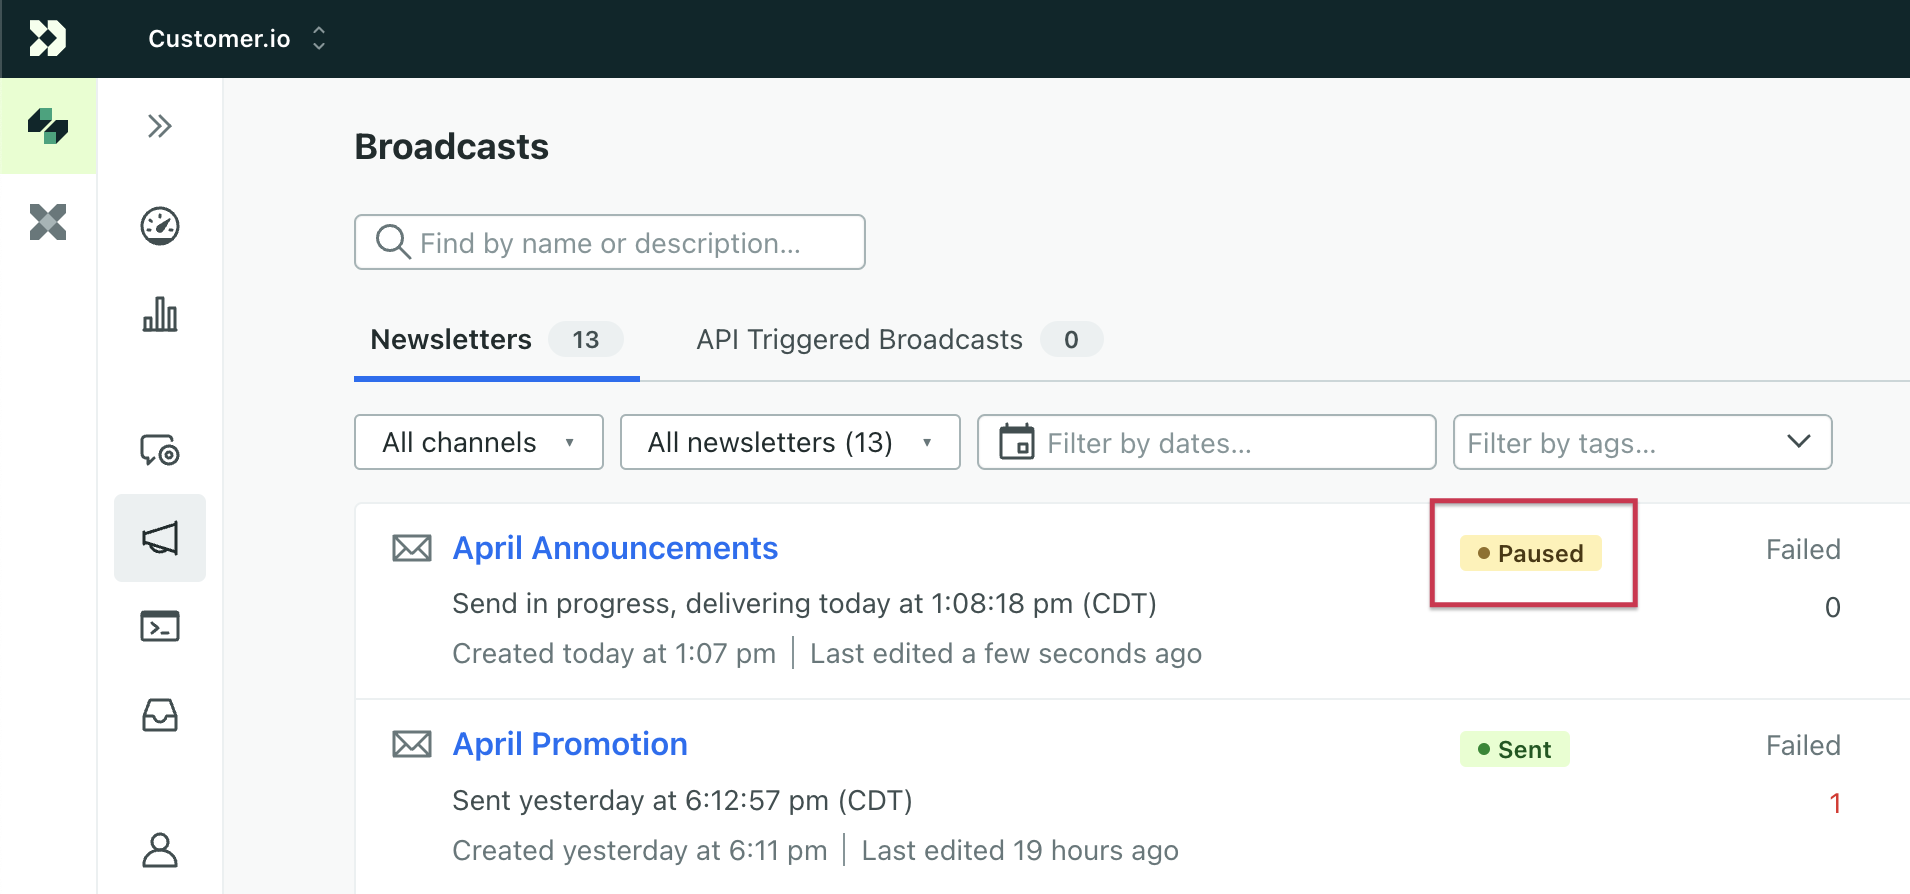
Back on the Broadcasts landing page, the broadcast’s status will change to Paused.
Go to the Content tab, click Edit content and make your changes.
If editing a message with A/B variations, choose the variation then proceed to edit.
You can modify any message content (email, in-app, etc) or field (subject, to, from, etc). You can’t modify your recipient conditions, tracking parameters, goals, or send options (rate limiting).
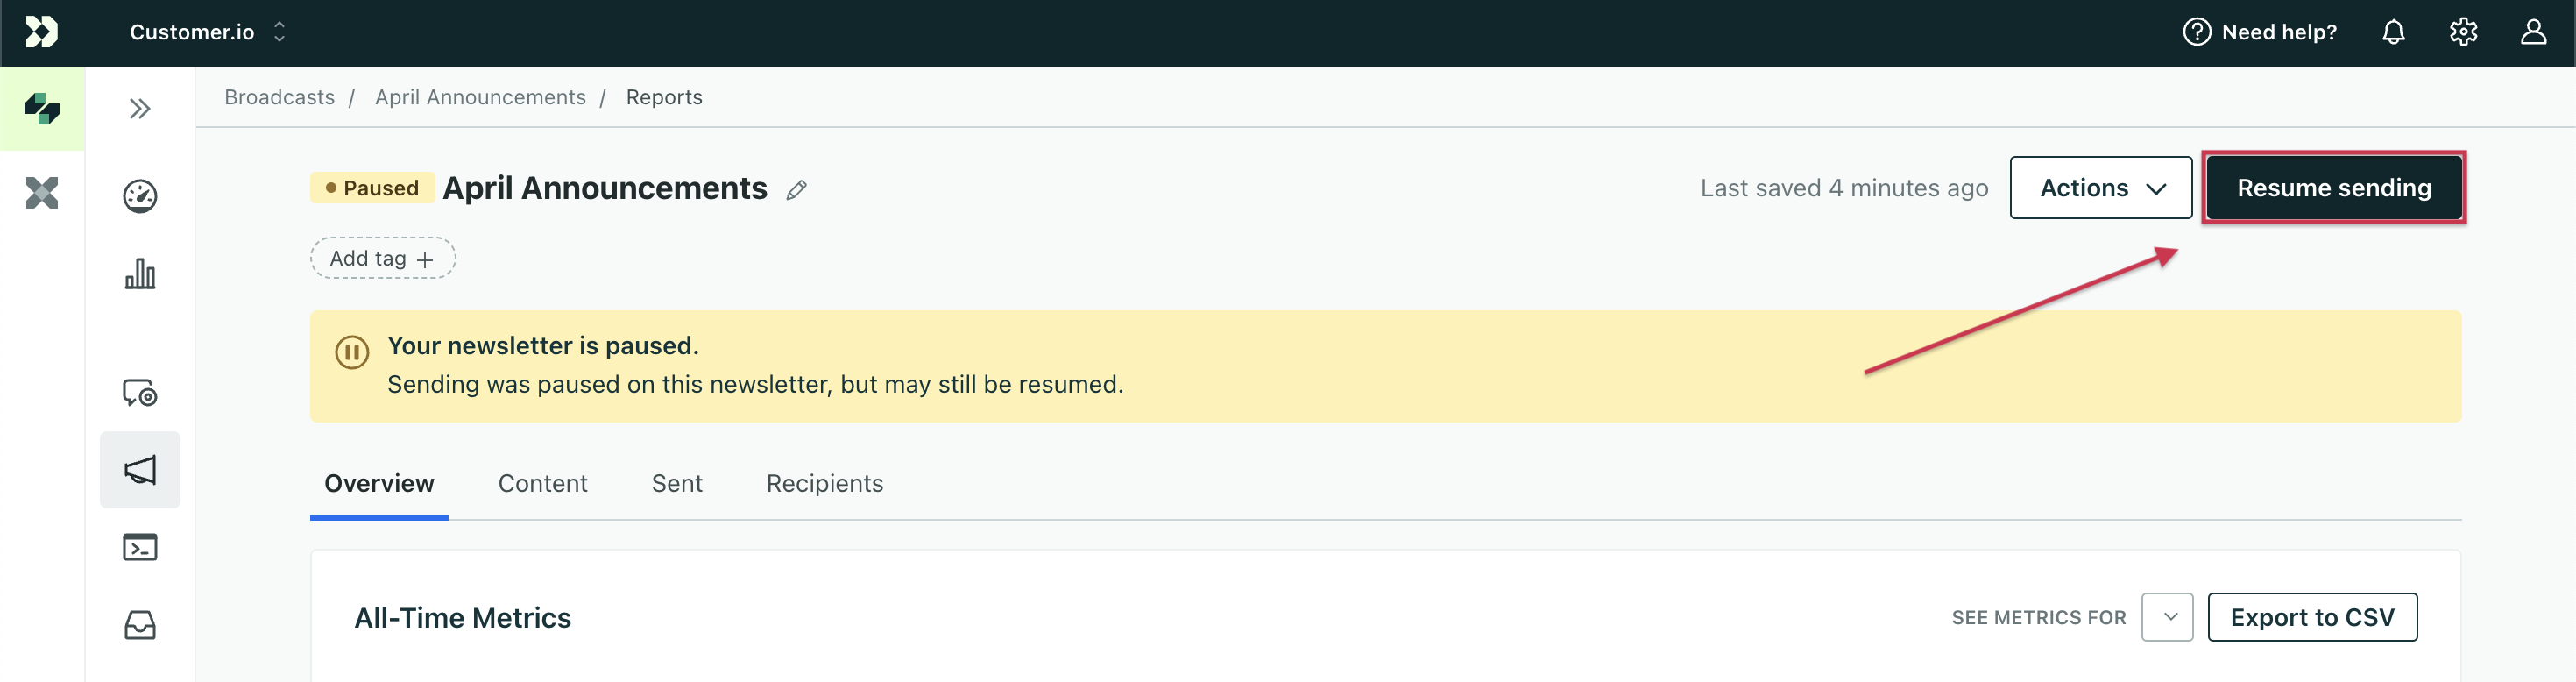
After you make your changes, click Resume sending in the top-right of the one-time send then confirm your action. The message will continue sending to people who have not received the message yet; people who already received the message will NOT receive another version.
The broadcast’s status will update to “Sending” then “Sent” when all recipients have received it.
You cannot pause one-time sends that send in a user's time zone.
You can pause one-time sends with A/B variations and with a rate limit. But you cannot pause one-time sends that are scheduled to send in a user’s time zone.
Send to an individual person
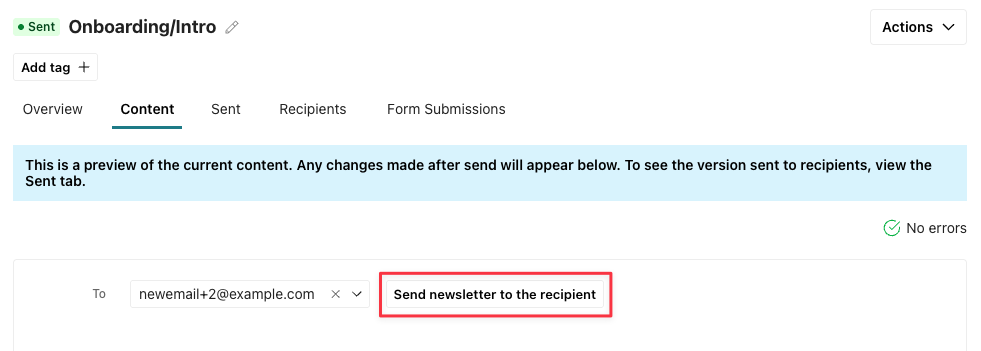
After you schedule and send your message, you can send the content to an individual person who wasn’t in your original audience.
You can only send your message to an individual this way. If you want to re-send it to a large number of new recipients, you should copy the one-time send and re-send it to a new segment of people.
Go to Broadcasts and select the broadcast you want to re-send. The broadcast must have a sent status.
Go to the Content tab.
Select the Recipient you want to send your message to. The recipient must be a person already in your workspace; you cannot send a broadcast to a person you haven’t identified.
Click Send newsletter to the recipient.
Copy one-time sends to another workspace
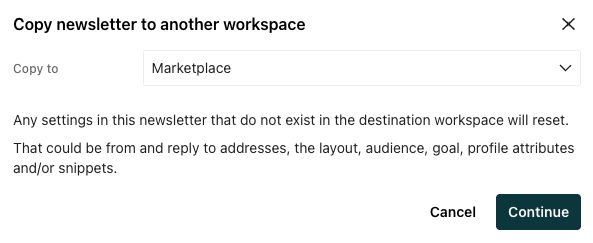
If you use similar messages in different workspaces, you can copy a broadcast or a one-time send to another workspace. Go to Broadcasts, find the one-time send or broadcast that you want to copy, and click Copy to. Then select the workspace you want to copy your items to, and click Continue.
Note that when you copy one-time sends and broadcasts, we’ll reset settings that don’t exist in the destination workspace—like layout, audience, etc. You should also check your liquid
syntax in your destination workspace. You may not have the same attributes or other variables in your destination, so you may need to update liquid statements to make sure that your messages render and send properly.


.png)